In this section I will go into detail about the components and their procurement that are needed for the robot car. Since I want to address teachers who want to build a cheap robot with their students, everything is optimized for low cost per model. I assume that such a project is planned for a longer time and that the time for the procurement of the components plays a minor role. Therefore, all components will be procured directly in China and if possible in packages of 10 to 20 components, as this reduces the price significantly. When sourcing, please note that the delivery time is usually between 3 to 6 weeks. I personally have never had bad experiences and out of about 50 orders 1 did not arrive. Mostly I got the money back from Ali Express.
Hint: In terms of procurement, the rule until 1 January 2021 is that individual orders should not exceed the value of €22. If the value of the order is below the 22,- € mark, the order is currently still exempt from customs treatment and thus also from VAT. From January 1, 2021, all orders will be cleared through customs and VAT will also be charged.
In the following section I will discuss the components that are necessary to build the robot car. I have only linked Amazon links here because I had problems to insert the Ali Express links.
But here you can at least go to the Ali Express web page: Ali Express
Robot Car Components
The following list lists all necessary components for the robot car to be able to drive through the apartment independently. With these components it is also possible to realize a control via surface on the Smartphone over the WLAN of the robot car.
Hint: The Power Bank was not included in the list of components because I assume that most students already have such a Power Bank at home. However, I will mention in an extra article an alternative power supply that is cheaper to buy than a Power Bank.
Chassis
There are of course many great chassis for robot cars but they all cost money again. But because we want to make our own and as cheap as possible, we use a no longer needed ice packaging as chassis. This offers enough space for the electronics and the procurement of the plastic packaging is also a pleasure.
ESP8266 NodeMCU developer board
This small board has been named and roughly described several times now. It is the brain of the robot car and the computer that controls everything.
PCA9685 servo controller
The servo controller is needed in the robot car to control the two geared motors via a motor driver. One servo motor is not installed at first but could be controlled by the servo controller. For example, it would be possible to turn the ultrasonic sensor by 180° to scan the environment in front of and to the side of the robot car.
Motor driver
Since the two geared motors cannot be connected directly to the ESP8266 NodeMCU, a motor driver is required to provide the high currents needed to operate the motors.
Ultrasonic sensor
For the robot car to react to its environment it needs a sensor. Classical for distance measurement are ultrasonic sensors. Because they are cheap and reliable, such an ultrasonic sensor is installed in the robot car.
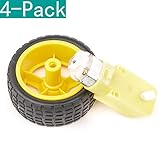
Geared motor
The gear motors provide the propulsion of the robot car and also the steering. The robot steers the car like a tracked vehicle by turning the wheels at different speeds or by rotating the motors in opposite directions. This allows the robot to turn on the spot.
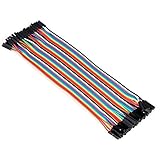
Wires
In order that all electronic components can be wired together, jumper cables are required for the logical wiring. These so-called female-to-female jumper cables can be installed by simply plugging them in. Furthermore a classic two wire cable (one red and one black wire) is needed to connect the motors to the motor driver.
USB-cable
Two USB cables are required for programming and power supply. A micro-USB cable to connect the NodeMCU to the PC / Laptop. An old USB cable that can be cut off to supply the motor driver with power. Such an old USB cable can usually be obtained free of charge at the local recycling centre for electronic waste.
Summary
With these components the robot car described in this article series can be built. Of course there are many combinations possible from the chassis to the electronics. Therefore, the manual is to be understood as a kind of red thread which conveys the basics and the necessary knowledge but can be implemented individually depending on experience.
Article Overview ESP8266 NodeMCU Robot Car:
Building robots with the ESP8266 development board – IntroductionBuilding robots with the ESP8266 development board – Power supply
Building robots with the ESP8266 development board – Components
Building robots with the ESP8266 development board – chassis
Building robots with the ESP8266 development board – Wiring Part 1
Building robots with the ESP8266 development board – Wiring Part 2
Building robots with the ESP8266 development board – Setting up the Arduino development environment
Building robots with the ESP8266 development board – Ultrasonic sensor and motor control
Building robots with the ESP8266 development board – WIFI remote control
Building robots with the ESP8266 development board – servo motor control
Building robots with the ESP8266 development board – OLED display
Building robots with the ESP8266 development board – Magnetometer
Building robots with the ESP8266 development board – GPS receiver introduction
Article Outlook:
Building robots with the ESP8266 development board - GyroscopeBuilding robots with the ESP8266 development board - GPS waypoints
Building robots with the ESP8266 development board - Solar cell


![Anker Powerline Micro USB Kabel [4-Pack] 0.3m Ladekabel, Einer Lebensdauer von 10,000+ Biegungen für Samsung, Nexus, LG, Motorola, Android Smartphones und weitere (Schwarz) Anker Powerline Micro USB Kabel [4-Pack] 0.3m Ladekabel, Einer Lebensdauer von 10,000+ Biegungen für Samsung, Nexus, LG, Motorola, Android Smartphones und weitere (Schwarz)](https://m.media-amazon.com/images/I/41dDOaTwUbL._SL160_.jpg)


Recent Comments