


Now it’s time to install the Android Studio to create the Android app of the OpenBot project based on the released development status. The reason why you have to be able to create the app yourself is that whenever you have trained a new neural network it has to be integrated into the Android app via Android Studio. This integration of the own neural network only works if the app is created with this network as a file. This somewhat cumbersome way may be solved in the future, e.g. if a newly trained neural network can be loaded directly into the app from the smartphone memory. However, it is important to be able to create the app yourself if the structure of the neural network, i.e. the input parameters and the weighted output parameters are to be adjusted. This can be the case if e.g. new sensors are added to the robot car which are not yet provided in the current design of the neural network.
But now we have to install the Android Studio first. You can download the latest version for your operating system from the following link. These instructions explain the installation under Windows.
Download link: Android Studio Developer
After you have downloaded the Android Studio, install it on your computer. During the installation I chose the standard installation without changing any settings. Next I installed all the updates that the Android Studio suggested.
Install Android SDK versions additionally
Since the freshly installed Android Stuio only had the latest SDK version installed I had to install two older Android versions (10 & 9) to avoid the error message Modules: ‘app’ platform ‘android-28’ not found. which I got later during the app development. So please install the following versions if you don’t have them installed.
For Windows you can find the corresponding menu via: File -> Settings… -> Appearance & Behavior -> System Settings -> Android SDK
Set the checkboxes here for Android version 10 and 9 and have them installed by clicking the “Apply” button.

Android Studio SDK Version
Now the Android Studio should be set up. The next step is to download the OpenBot Android app from the Git repository.
Set up OpenBot Android App source code
After the Android Studio is installed, the OpenBot Android App has to be placed in a folder on your computer. You can find the Android app under the following link on the Git repository
Repository link: https://github.com/intel-isl/OpenBot
In the upper right corner it is possible to download the current development status as a ZIP file.

Android App GIT download
If you have the *.ZIP file on your computer then please unzip it on your computer. The structure should look like the following picture. The folder with the name “android” is the folder you have to import into the Android Studio because it contains the app as source code.
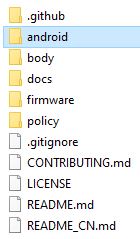
Android App folder structure
In the Android Studio itself, select this folder “android” and import it into the Android Studio. This can take a few minutes until the app is imported. Also other modules that are necessary will be installed.

Android Studio Open File or Project
Now you just have to click on “OK” and the folder with the app source code will be imported.
To transfer the app to your Android smartphone you have to change some settings on your smartphone. More about this in the following section.
Prepare Android Smartphone
To make sure that the OpenBot app can be transferred to your smartphone when recompiled in Android Studio, you have to activate the developer and debugging mode on your smartphone. In the following section I will explain how you do this.
Activate developer mode on Android smartphone
To do this you open the menus as follows:
Settings -> Phone info -> Software information
The menu item Software Information contains the entry “Build Number”. Tap on it approx. 7 times or until you get the message that the developer mode has been activated. The following picture shows exactly the message that appeared after tapping this entry many times. Now the developer mode is activated on your smartphone and you have a new menu entry Developer Options visible under the menu Settings.

Android Smartphone activate developer mode
USB-Debugging Modus
Now you have to activate the USB debugging mode on your smartphone. Open the menus again as follows:
Settings -> developer options
In the Developer Options menu there is the entry USB Debugging. Activate it as shown in the following picture.

Android Smartphone activate USB debugging
Now everything is set up on your smartphone so that the Android Studio should recognize your smartphone and as described in the next article the OpenBot app can be compiled and transferred to your smartphone.
Summary
With this article you have now prepared the development environment Android Studio and your smartphone for development. We won’t develop much at first, because it’s about recompiling the OpenBot app together with your own neural network. How exactly the OpenBot app works with the own neural network I will explain in the next article.
Article Overview OpenBot robot cuto:
OpenBot – Your smartphone controls a robot car – IntroductionOpenBot – Your smartphone controls a robot car – needed parts part 1-2
OpenBot – Your smartphone controls a robot car – needed parts part 2-2
OpenBot – Your smartphone controls a robot car – constructing a chassis
OpenBot – Your smartphone controls a robot car – Wiring
OpenBot – Your smartphone controls a robot car – Flashing the Arduino firmware
OpenBot – Your smartphone controls a robot car – Android App and first test run
OpenBot – Your smartphone controls a robot car – Record training data
OpenBot – Your smartphone controls a robot car – Set up training environment
OpenBot – Your smartphone controls a robot car – train the neural network
OpenBot – Your smartphone controls a robot car – Setting up Android Studio and your Smartphone
OpenBot – Your smartphone controls a robot car – compile your own OpenBot Android app


Recent Comments