


After two years of work I finished my self-driving robot car. The robot is able to navigate and to autonomously drive around in the yard. It is equipped with different sensors and the combination of the sensors information enables the bot to drive around. The first self-driving robot was the Discoverer which is equipped with a metal detector. The challenges where the powertrain, the energy supply, the sensor setup and data integration into my self developed Python programs to control the driving direction.
The following pictures shows the self-driving car which I build from a floppy disc box.
Raspberry Pi self-driving robot-car 4
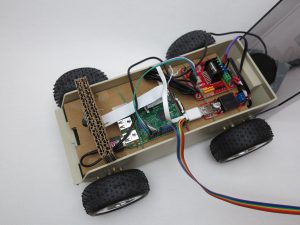
The next close-up shows the floppy disc box. As central processing unit or brain of my self-driving car I am using a Raspberry Pi 3 model B. Above the lock of the floppy disc box you see the Raspberry Pi camera which is used for live video streaming out of the bot. With the video-stream and a simple web-interface I am possible to control the car.
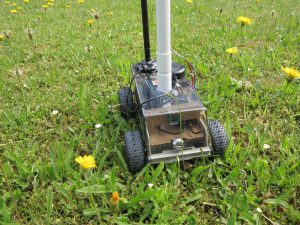
Raspberry Pi self-driving robot-car 1
Raspberry Pi robot-car component list:
If I could awaken you interest how to build such a robot with a Raspberry Pi computer as central controlling unit you will find a list of components on my blog to help you. The component list is an overview of electronic components or ready to assemble kits which I used by myself and which I could recommend with good conscience. I used most of the components in my own projects and checked the functionality and compatibility with a Raspberry Pi.
This is the link to the component list: component list

ZeroBorg motor controller - robot-car components
robot with four gear motors
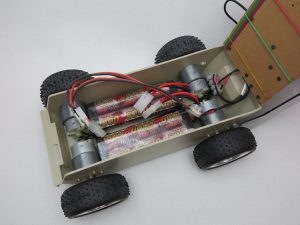
The dc gear-motors I am using inside my robot-car are not strong enough for the rubber tires. The robot-car is turning like a tank on the sport the robot needs much power to turn the chassis in the grass. The dc-motors do not have the power to turn the robot and I bonded duct tape around the wheels. This makes the wheels slippery and enables the robot-car to turn on the spot. The pictures below shows the inside of the robot-car with the four dc-motors.
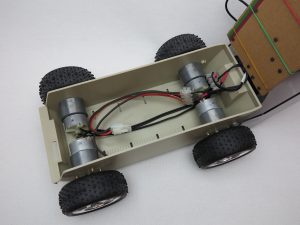
Raspberry Pi self-driving robot-car 15
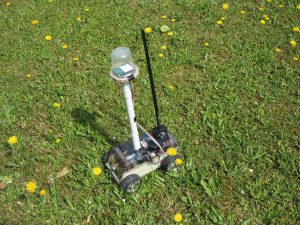
The next picture shows the robot-car from the left side. You see on the picture the gps receiver and the external WIFI-antenna which boost the signal up to 12 dB. This is important because the WIFI signal will get week very fast outside of your apartment far away from your router.
Raspberry Pi self-driving robot-car 2
Sensors of the self-driving car
I am using different sensors in my bot which enabling the robot-car to drive autonomously around. Above the chassis on top of the white PVC pipe I mounted the Raspberry Pi Sense-HAT. The Sense-HAT is equipped with six sensors:
- Gyroscope
- Accelerometer
- Magnetometer
- Temperature
- Barometric pressure
- Humidity
Beside the six sensors the Sense-HAT is equipped with a 8×8 RGB LED matrix and a tiny joystick.
To protect the Sense-HAT from the environment I used an empty yoghurt cup. The yoghurt cup protects the Sense-HAT against dust and moisture.

Raspberry Pi self-driving robot-car 3
Additional to the sensors of the Raspberry Pi Sense-HAT I am using a GPS receiver to enable the car to drive from one waypoint to the next one. I tested a few GPS receivers and actual I am using a 167 Channel GPS receivers in this floppy disc self-driving car.
Actual I am not using the SRF08 ultrasonic sensors I normally use for my bots in this model. I do not have a workshop and to drill the holes and mounts into the plastic box isn’t easy. But it would be very interesting to use the ultrasonic sensors in this car while it is driving around in the yard.
Some close-ups from inside the self-driving car
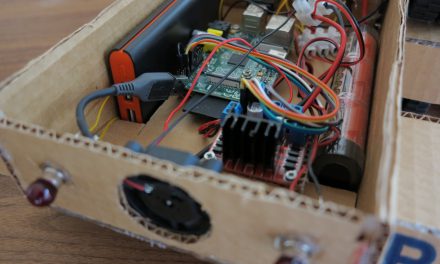
The picture below shows the cardboard on which I mounted the Raspberry Pi, the motor driver and the step-down converter. Partly I mounted the electronic components to the cardboard with some rubber bands and nails I stick through the cardboard and holes of the PC boards of the electronic components.
Raspberry Pi self-driving robot-car 14
Power Supply
Below the cardboard with the electronic components the rc-accus are located. I connected the two accus in series. The supply constantly the motors with 14.4 voltage and 5.000 mAh current. The accus are located between the four dc gear-motors. With this setup the weight distribution of the car is very good. The both accus are good enough for 30 – 45 minutes of driving around with the car. The wheels are normal rc-car tieres which are directly mounted on the axis of the dc-motors.
Raspberry Pi self-driving robot-car 16
Video – self-driving car
A video which shows the self-driving car driving around in the garden is available on YouTube. In the video you will also see the live video streaming from inside the car to my desktop to control the driving direction.

Summary
I am very happy with the small self-driving car and all electronic components inside the car. The Raspberry Pi is perfect for such a project and to build a self-driving car. The add-ons like the Raspberry Pi Sense-HAT is perfectly supported by the operation system Raspbian and very easy to program. All programs are written in Python for the bot. The GPS receiver works perfect with the gpsd tool together with LINUX / Raspbian. Now with the GPS receiver the bot is able to drive from one way point to the next one. I little soldering work was done to get the Sense-HAT running above the chassis.


can i get some more information about your project ?
like …circuit diagram , code and components you have used ?
Hi arsl,
more informations are available in my e-book:
e-book
Maker