


My big BigRob robot is built so that it can operate for many hours outdoors. Equipped with a Raspberry Pi camera, this robot can not only generate a live video stream of its environment but also record the images for time-lapse video recordings, so-called timelapse videos. More precisely, he can use the camera to store the necessary images, such as one image every second, and then create a video from the thousands of individual images.
The following picture shows my Raspberry Pi 2 Model B with the wide angle camera.
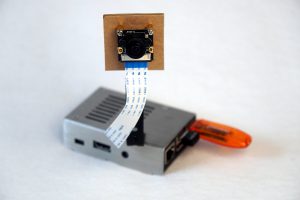
Raspberry Pi – Zeitraffer Video Kameraaufbau
How exactly this works I would like to explain here in this short tutorial using a Raspberry Pis.
Required components
First of all the Amazon Shop list of components needed for this project.
Raspberry Pi Computer
I recommend the current Rapberry Pi 3 Model B+ for this project. The Raspberry Pi 3 is very well suited because for the creation of the video processing power is needed. Please really make sure that the latest model is taken with 1.4 GHZ.

Raspberry Pi camera wide angle
As a camera I always like to use a wide angle camera. This model I have more often used on a robot Modellan at work.

Micro SD-Card
A simple model is sufficient as a micro SD card. Because the many pictures are stored on a USB stick.

USB drive
For the USB stick, I recommend a model that is at least 64GB in size and not too slow in writing speed. I myself used a cheap model for this manual that writes about 4 MB/s. This is quite slow if you want to copy a few GB of pictures and videos.

Required software
I assume that the latest Raspbian is installed and a terminal window is open, e.g. via SSH. Because first of all ffmpeg has to be installed to be able to create the video from the many single images later.
To install ffmpeg, please execute the following command in the terminal window.
Command: sudo apt-get install ffmpeg
After the installation of ffmpeg, as far as all software is available what is needed.
Activate camera
After connecting the Raspberry Pi camera with the CSI cable, it must be activated in the Interfaces menu item of the configuration menu under Raspbian. To do so, please execute the following command and activate the camera.
Command: sudo raspi-config
Now please restart the Raspberry Pi after the camera has been activated.
Integrate USB stick
The USB stick still has to be formatted and integrated. To do this, please follow the steps in this very detailed manual linked hereRaspberry Pi: Connecting USB stick and USB hard disk.
In case the link is no longer available, here are the essential commands to mount the USB stick as exFAT (formatted under Windows).
1. software installation:
Command: sudo apt-get -y install ntfs-3g hfsutils hfsprogs exfat-fuse
2. find device names:
Command: sudo blkid -o list -w /dev/null
3. embed USB stick as exFAT (e.g. formatted accordingly under Windows)
Command: sudo mount -t exfat -o utf8,uid=pi,gid=pi,noatime /dev/sda1 /media/usbstick
Image capture script
The script that creates the images is more or less a Python script that executes a command on the command line. The Python frame is therefore not necessary but may make the operation a bit easier. Simply save the following code into a file with the sample name “take_picture.py”.
import os
import time
# runtime is the time how long the time lapse should record pictures in minutes
runtime_min = 20
# millisecond calculation
runtime = runtime_min * 600000
# intervall is the time between each picture in seconds
intervall = 1
# millisecond calculation
intervall *= 1000
# picture destination path
dest_pic = '/media/usbstick/pictures/'
print ("Starting time lapse for "+ str(runtime_min) +" minutes.")
os.system("raspistill -t "+str(runtime)+" -tl "+str(intervall)+" -o "+ dest_pic +"image%06d.jpg -w 1920 -h 1080")
print ("finished.")
In order for the script to be able to save the images, the folder “/media/usbstick/pictures” must be created on the USB stick that is connected to the system.
Then the program can be executed with the following command.
Command: sudo python take_picture.py
From now on, the camera images should be saved in the folder “/media/usbstick/pictures”.
Create time-lapse video script
In order to create the video the images must be readable by ffmpeg. This time I created a small shell script for this. Simply create this again with the following name “ffmpeg.sh” and content.
#!/bin/bash
ffmpeg -y -f image2 -pattern_type glob -i '/media/usbstick/pictures/*.jpg' -r 24 -vcodec libx264 -profile high -preset slow /media/usbstick/animation.mp4
Then change the file permissions so that the script can be executed. The easiest way to do this, but not very nice either, is to use the following command.
Command: sudo chmod 777 ffmpeg.sh
Use the following command to start the script. It then creates the animation.mp4 video file.
Command: sudo sh ./ffmpeg.sh
After the video has been created, it can be viewed with the Video Lan Player, for example.
Here is a video that I made with a Raspberry Pi 2 Model B and a Raspberry Pi wide angle camera. For this I used the scripts I presented here.

Summary:
This tutorial, as concise as it was described, was intended to teach the basics of how many frames can be captured with a Raspberry Pi camera and then processed into a time lapse video. The great thing about this solution in my opinion is that all tools are free and work reliably. It is important that the USB stick is always integrated so that the micro SD card does not overflow.
Article overview
The following contributions are up to now run around the topic of time-lapse video by mitgeschreiben worden.
Raspberry Pi Timelapse Photography Tutorial – Images in fast motion video


Recent Comments