


After my first article about the time-lapse video project on a Raspberry Pi computer I continued to work on the software. Because in my first article I describe more or less the basics and give some hints how to create a time-lapse video with a simple Python program as a frame for raspistill and a script for ffmpeg. This was of course still a very cumbersome solution and a web interface would be ideal for controlling the recording. This is because the Python program for recording the images had to be started manually in the console until now. The duration, i.e. over which period of time and with which interval images should be taken, had to be adjusted in the program code itself every time a change was desired. Afterwards the creation of the video via ffmpeg had to be started manually.
This was far too complicated and not easy to use. So I have built a small web interface where I can create a preview image to align the camera and start the timelapse recording. Afterwards the mp4 video with ffmpeg is generated from the recorded images.
The following picture shows the web interface with its functions in version 1.1.
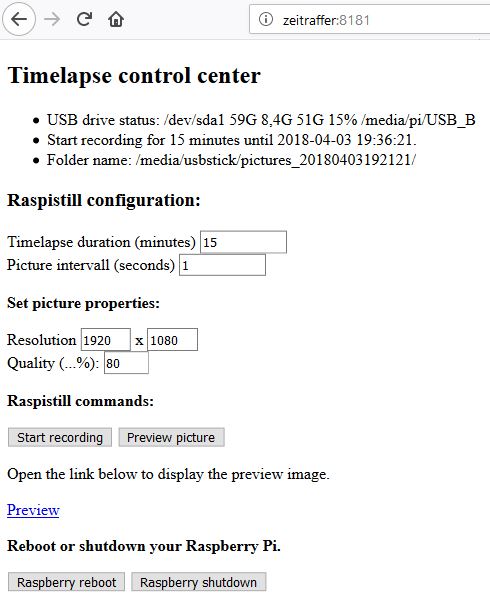
Raspberry Pi Zeitraffer – Web Oberfläche Version 1.1
Option overview
The following functions can be set and executed on the Web interface.
- Timelapse duration (minutes): You can set in minutes how long the timelapse recording should be active.
- Interval: The interval determines how many seconds should be waited between each additional shot.
- Resolution: The width and height of the captured images can be set here.
- Quality (…%): The compression of the JPEG images, i.e. the quality of the images as a percentage, can be specified with this option.
Buttons
There are currently four buttons in this version.
- Start recording: This button starts the recording as configured.
- Preview picture: Pressing this button creates a preview picture that can be opened via the link below the two buttons.
- Raspberry reboot: Pressing this button restarts the Raspberry Pi.
- Raspberry shutdown: Pressing this button will shut down the Raspberry Pi.
For the software to work, a few additional programs must be installed on the Raspberry Pi. More about this in the following section.
Required software
The FLASK Web Server is required to access the web interface with a browser. This is easily installed with the following command.
Command: pip install flask
Since the web interface has two input fields and buttons, I installed web forms for the FLASK web server. So the information about the duration of the recordings and the interval between the individual images can easily be transferred to the Python logic. The following command will install the Flask WTF.
Command: sudo pip install –user Flask-WTF
After the installation of these two add-on modules and the software from the first article Raspberry Pi Timelapse Photography Tutorial – Images in fast motion video for the Timelapse Video Project, everything is ready to install the extension with the web interface on the Raspberry Pi.
Web interface time-lapse video project
The whole project is kept quite small and consists of four files and two folders. These can be placed in the folder /home/pi/timelapse on your Raspberry Pi, for example.
The program files for the time-lapse software can be downloaded here: GitHub
It is important to make sure that the paths are adjusted accordingly in the Python program if these differences occur. I also store the pictures on a USB stick. Here, for example, the mount command may cause minor deviations. But again I would like to refer to my first article (see link above).
Autostart timelapse program
The Python program “timelapse.py” can be stored in the crontab to start it automatically. To do this, please first execute the following command.
Command: sudo nano /etc/crontab
Then insert the following two lines.
# Start start-tl.sh
@reboot pi /home/pi/timelapse/start-tl.sh &
The crontab should then look like this.
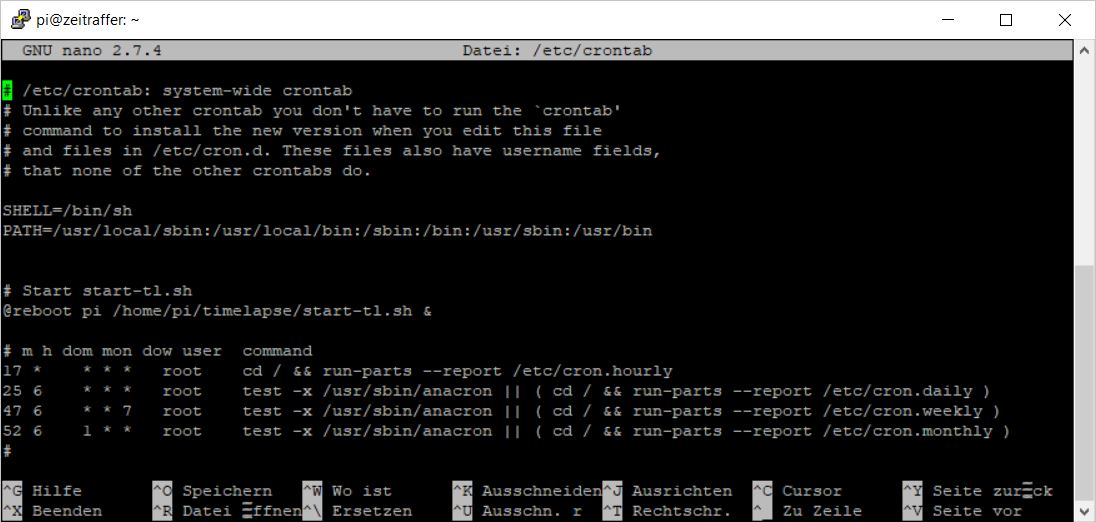
Raspberry Pi Zeitraffer – crontab
The start-tl.sh script must be executable by its privileges. This can be achieved with the following command, for example.
Command: sudo chmod 777 start-tl.sh
After the adjustments, restart the Raspberry Pi and call up the following URL <IP address Raspberry Pi >:8181 in the browser. If there was no error now (see log files) then the web interface should open.
Hint:
Instead of making the entry in the crontab, it is also possible to modify the rc.local file in the /etc/ folder. To do this, the Nano Text Editor is again started with the following command.
Command: sudo nano /etc/rc.local
In the rc.local file, enter the following line before the “exit 0” entry.
/home/pi/timelapse/start-tl.sh
exit 0
Here you can learn more about the use of rc.local:
URL: https://wiki.ubuntuusers.de/rc.local/
Summary
I already enjoyed the project a lot when it was not yet accessible via an easy to use web interface. But now it is really easy and fast to use. Also the whole pipeline from the creation of thousands of single images up to a finished mp4 video is solved very comfortable. The function with the preview image simplifies the alignment of the camera considerably.
Article overview
The following contributions are up to now run around the topic of time-lapse video by mitgeschreiben worden.
Raspberry Pi Timelapse Photography Tutorial – Images in fast motion video


Recent Comments