

With one of my robots, more precisely with the GoPiGo model from Exter Industries, I bought a 9-DOF IMU sensor, the BNO055 from Bosch. The great thing about this sensor is that it outputs the orientation as XYZ as absolute values. This simplifies a lot when developing your own software in the robot. The sensor I use can be found at Dexter Industries under the following link (IMU Sensor).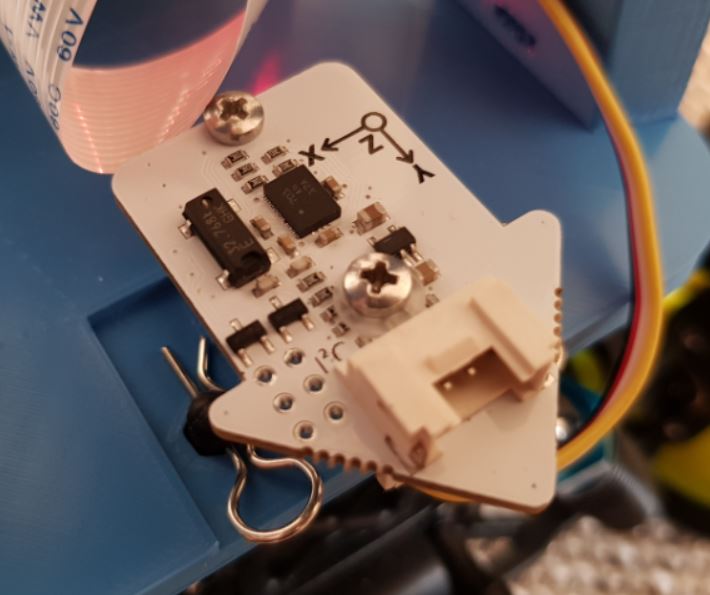
Dexter Industries BNO055 Sensor
Note Software: I had a hard time getting the Dexter Industries software to work when I wanted to use the sensor without the robot. So I installed the software from Adafruit to your BNO055 sensor.
Note I2C bus: The BNO055 sensor also expects a special I2C configuration. So the baud rate of the I2C bus must be throttled. This in turn can lead to problems with other I2C devices. One solution would be to connect the BNO055 sensor via the serial interface.
BNO055 via the I2C interface
In the first section the I2C interface is used to communicate with the BNO055 sensor. To do this, the Adafruit software is installed and the test programs are executed.
Software Installation circuitpython
As written in the first note, I have installed the software from Adafruit. Here I followed the instructions step by step and was able to put the sensor into operation after reducing the I2C bus speed.
Command: sudo apt-get update
Command: sudo apt-get install i2c-tools
Command: sudo apt-get install python-smbus
After the I2C bus has been activated, the sensor should be found and displayed on the I2C bus with the following command
Command: i2cdetect -y 1
The instructions for the software installation can be found here: Python Installation of BNO055 Library
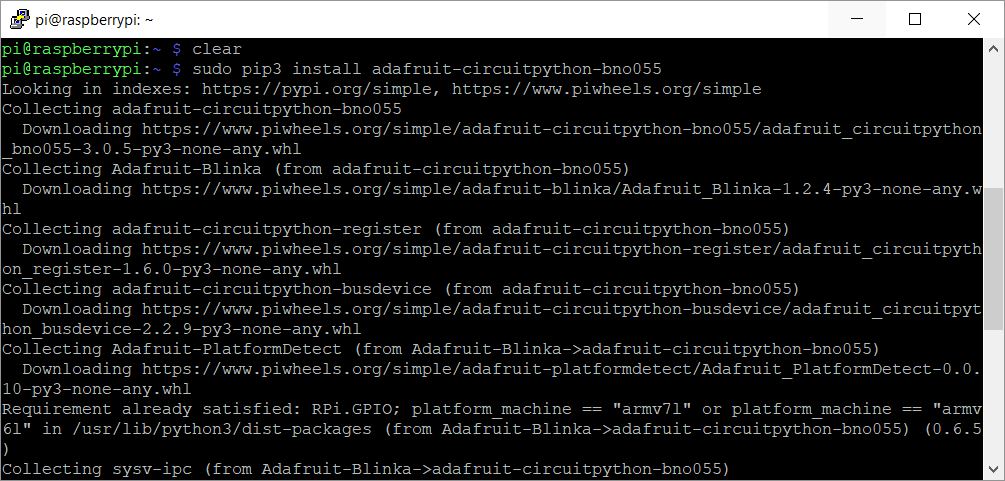
The command to install the necessary packages is as follows.
Command: sudo pip3 install adafruit-circuitpython-bno055
Adafruit circuitpython bno055 installation
After the installation the speed on the bus must be adjusted. Adafruit has published the instructions here: I2C Clock Stretching
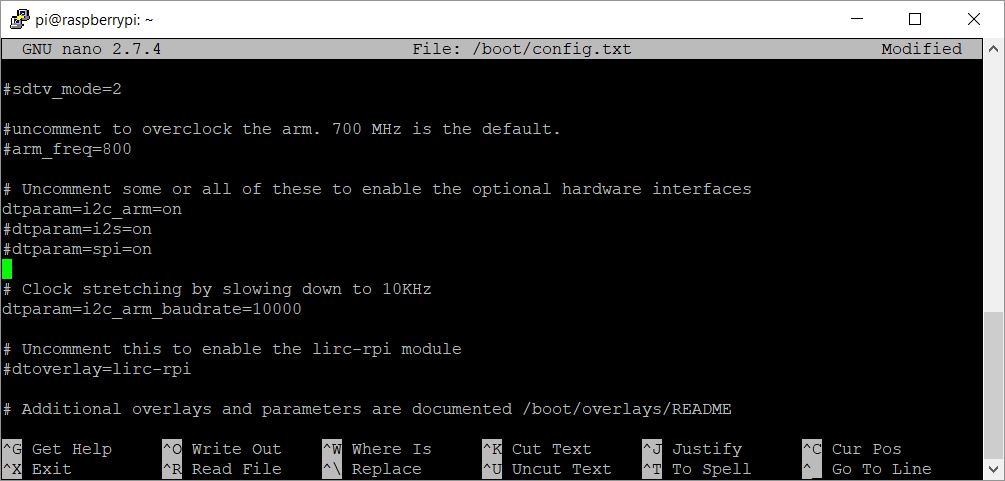
It is important that the I2C bus on the Raspberry Pi is activated via the configuration menu. Then a small change must be made in the /boot/config.txt. To do this, open the /boot/config.txt file with the following command and adjust it.
Command: sudo nano /boot/config.txt
In the config.txt file please look for the three entries which may look slightly different depending on your bus configuration.
- dtparam=i2c_arm=on
- dtparam=i2s=off
- dtparam=spi=off
Then insert the following line after these three lines to throttle the bus speed.
# Clock stretching by slowing down to 10KHz
dtparam=i2c_arm_baudrate=10000
I2C clock stretching
I am not very satisfied with this solution and will probably activate the serial interface of the BNO055 sensor in a next step. For this the pin 1 has to be pulled HIGH as far as I understood.
Execute test program
Now the software installation and configuration should be finished so far that the test program should run. Please copy the program code from the Adafruit website and save it as a Python program named “bno055.py” and execute it with the following command.
Command: python3 bno055.py
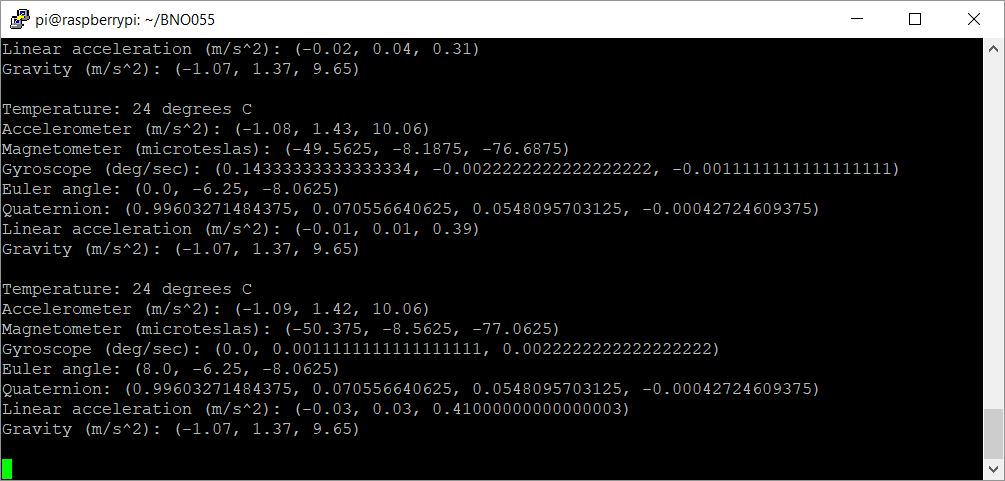
BNO055 Sensor
The program displays the current values and the sensor thus functions on the I2C bus. The bus speed settings were also adopted. Without this configuration, the sensor cannot be found.
BNO055 via UART serial interface
In the following section the serial interface is used instead of the I2C bus. To do this you need to install another library from Adafruit which does not use circuitpython but native Python.
Note: At the time I wrote this report, there were already indications that communication via the serial interface would become my preferred method of communication.
Configure serial interface
If the BNO055 is connected to the Raspberry Pi at the serial interface instead of the I2C bus, this must be configured accordingly. Adafruit has described the exact procedure here Hardware.
The first thing to do under the Raspberry Pi configuration is to disable the serial port for login via it. However, if the questions should come up the serial interface must remain active. Only the use for a login via this must be deactivated.
Command: sudo raspi-config
Then execute the following command.
Command: sudo systemctl disable serial-getty@ttyAMA0.service
Now restart the Raspberry Pi.
Command: reboot
Installing PySerial
The BNO055 or the library of Adafruit needs PySerial for communication. Because I had problems installing PySerial, there was always a SSL certitication error, I downloaded PySerial and installed it by hand. The following description explains the individual steps.
Donwload: https://pypi.org/project/pyserial/#files
- Extract the Archive
tar -zxvf pyserial-X.X
- Go the pyserial directory
cd pyserial-X.X
- Build the package
python3 setup.py build
- Install the package
sudo3 python setup.py install
Software installation Python libraries
To use the UART interface of the chip under Python, the Adafruit software must be installed as follows. First download the repository from GitHub as follows.
Command: git clone https://github.com/adafruit/Adafruit_Python_BNO055
After the git repository is downloaded, it can be installed under Raspbian as follows.
Command: sudo python setup.py install
Then the following libraries must be installed.
Command: sudo apt-get install python-rpi.gpio python3-rpi.gpio
Activating the UART interface on the BNO055
To enable the UART interface instead of the I2C interface the PS1 pin or pad must be pulled HIGH. To do this, simply cut the small jumper above the PS1 pin between the two solder pads. Afterwards the UART interface is active. If you want to activate the I²C interface again, the bridge must be closed again with solder, for example.
BNO055 Calibrate sensor
The BNO055 sensor can be calibrated with the Python program that provides a simple web interface. To do this, the program must be started in the folder /examples/ in the directory /webgl_demo/server.py. The sensor is then calibrated by moving it. When all three axes have reached a value of 3, the sensor is calibrated.
However, the calibration is continuous and I have not yet fully understood the purpose of this step. This is because the calibration can also deteriorate over time.
Alternative BNO055 Sensor Boards
There are several alternative BNO055 sensors to the one from Dexter Industries. Here is a small selection of sensors I found on Amazon.


Recent Comments