

I had already worked with Jupyter notebooks for the first time in 2017 and liked the way of coding. So it is possible to write documentation and program code in a very clear way in one notebook which you also execute in the Jupyter environment. Therefore I would like to describe in this post how Jupyter can be installed on a Raspberry Pi.
The idea I follow with this is to test my different sensors and to try out and document the description and code in Jyputer notebooks.
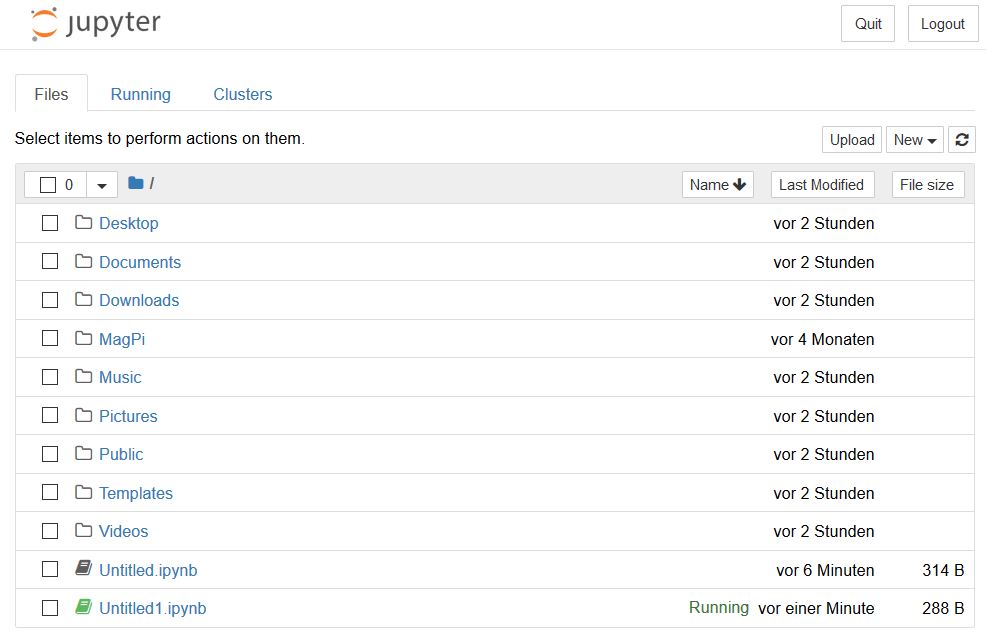
Jupyter Notebook Raspberry Pi
A very good online documentation can be found here: https://jupyter-notebook.readthedocs.io/en/stable/index.html
Software installation – Jupyter-Notebook
I install everything on a Raspberry Pi 3 Model B+. To ensure that everything works smoothly, the latest version of the package management pip is installed first.
Command: sudo pip3 install --upgrade pip
After the package management is up to date, Jupyter can be installed as such on the Raspberry Pi with the following command.
Command: sudo pip3 install jupyter
The installation took me about 20 minutes because my internet connection was not really fast. After that the software was completely installed on my Raspberry Pi.
Run Jupyter notebook
Since I have never connected a monitor to my Raspberry Pi computer, since they are usually built into robot cars, I present two ways to start the program Jupyter-Notebook.
Jupyter-Notebook – graphical user interface
The following command starts the program Jupyter-Notebook from the console on the graphical interface of Raspbian.
Command: jupyter notebook
A browser will also open immediately in which the Jupyter notebook can be seen running.
Now it is also possible to start the Jupyter-Notebook so that the browser is not immediately executed. To do this, please start the following command extended by –no-broswer.
Command: jupyter notebook --no-browser
In case of problems with the standard port 8888 of Jupyter-Notebook, an individual port can also be specified during execution. The command then looks as follows.
Command: jupyter notebook --no-browser --port 9000
Jupyter-Notebook – remote from another computer
After we have already learned in the previous section which parameters can easily be attached to the call of the Jupyter notebook it is almost clear how it is possible that a remote computer can access the Raspberry Pi on which the Jupyter notebook is running. To do this, you only need to add the IP address of the computer on which the Jupyter Notebook is running to the command with the parameter –ip=<IP-address>.
Command: jupyter notebook --no-browser --ip=192.168.1.44 --port 9000
If you don’t always want to share IP addresses via commandline, you can also do this via the configuration. A good description of how to create the config file and which value must be set to True can be found here: https://jupyter-notebook.readthedocs.io/en/stable/config.html?highlight=config
Starting your own notebook
Now you surely want to start an already existing notebook with your own programs and documentation. To do this, simply add the name of the notebook to the above commands, e.g. my_notebook.ipynb that is to be started. The command would look like this.
Command jupyter notebook my_notebook.ipynb --no-browser --ip=192.168.1.44 --port 9000
Enable Jupyter Notebook remote access
In the following section I will explain how to access Jupyter more easily without having to use the console. To do this, you must first create a Jupyter configuration file with the following command.
Command: jupyter notebook --generate-config
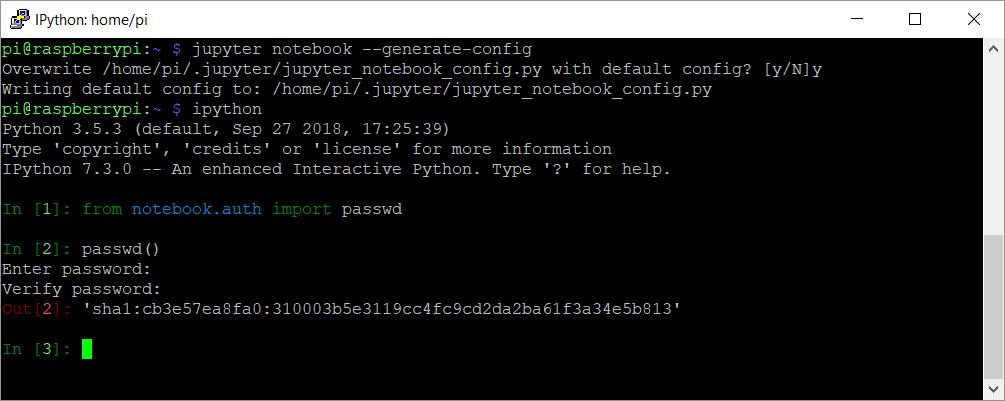
To access Jupyter remotely via password, a SHA1 hash of the password to be used must be created. To do this, please start ipython with the following command.
Command: ipython
In ipython, the following commands must be entered one after the other.
Command: from notebook.auth import passwd
Command: passwd()
When prompted, please enter the password to be used by the user when connecting remotely to the Jupyter Notebook.
The generated SHA1 hash is now copied and stored temporarily in a text file.
Jupyter config
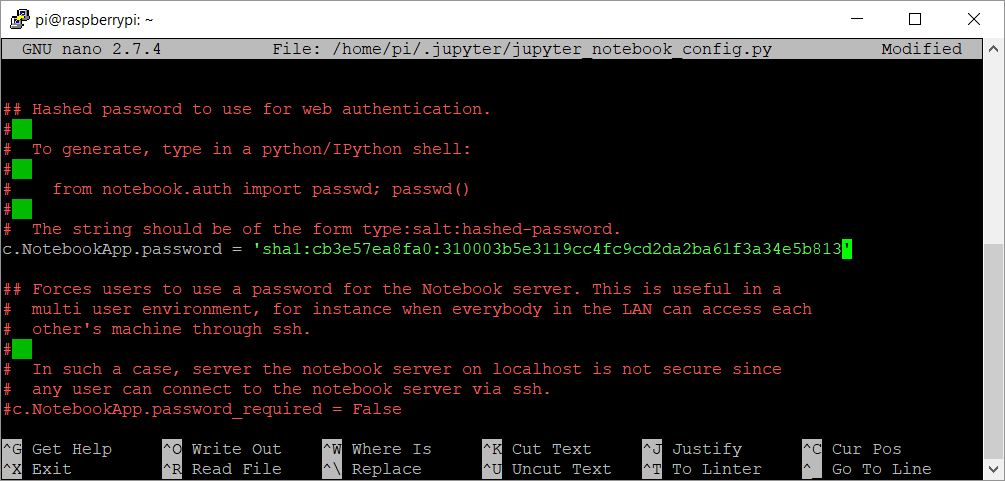
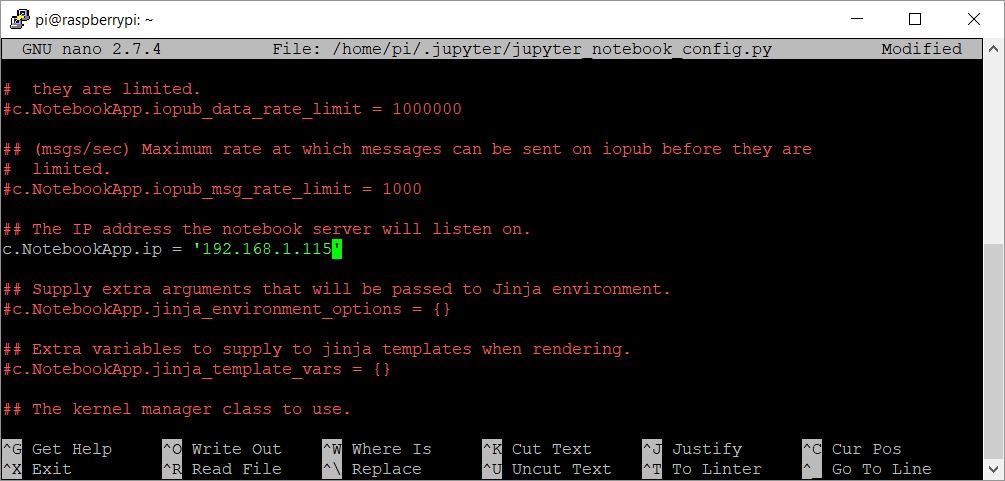
Now follows the configuration in the initially created configuration file of Jupyter Notebook. This can be found in the following path if all settings have been made under the user Pi.
Path: /home/pi/.jupyter/jupyter_notebook_config.py
Open the file e.g. with Nano and edit it in the following two places.
Add password
The password has to be added as SHA1 hash so that it is possible to log in remotely to the Jupyter notebook.
Jupyter config passwd
Add host IP address
The host IP address must be added so that Jupyter Notebook does not listen to localhost but to the IP address that the Jupyther Notebook server / computer has received.
Jupyter config IP
After everything is configured, Jupyter Notebook only needs to be started with the following command. It would also be conceivable to execute it automatically after each restart.
Befehl: jupyter notebook --no-browser
This is what Jupyter Notebook looks like in the console.

Jupyter config start server
Summary
Jupyter notebooks are simply ideal to try out small programs and to send the source code and description to other interested people.


Recent Comments