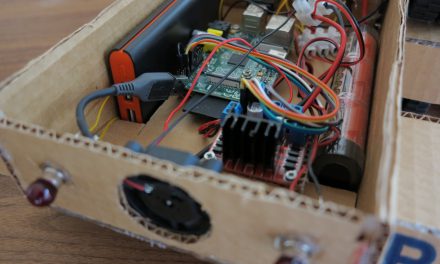
A reliable ESP32 power supply is the heart of your robot car. Depending on the option you choose, there are some prerequisites to consider. For example, for all battery solutions you’ll need a suitable charger—this does not apply to power banks, as they often have an integrated charging system or you already have a USB charger. A larger battery means longer runtimes, which is especially convenient if you want to use your robot more intensively. At the same time, more power often leads to more weight, which you should keep in mind when planning your project.
In the end, it’s up to you to decide whether ease of use, high performance, or long runtimes are more important. Here, I’ll show you the different possibilities and explain why I personally prefer a certain solution.
Three Options for the ESP32 Power Supply
1. Power Bank
A power bank is the simplest and most convenient option. It provides a stable voltage (usually 5V) and is excellent for directly powering the ESP32 module. However, this solution has its limits:
- The voltage is not sufficient to directly drive TT geared motors, and at 5V they run very slowly.
- A power bank is often very heavy and large. When purchasing one, ensure it fits into the robot car chassis.
Conclusion: Good for simple projects, but less suitable for more powerful robots.
2. RC Model Car Battery with Step-Down Converter
RC model car batteries provide a high voltage (usually 7.4V or 11.1V) and can supply enough power for all your robot’s components. With a step-down converter, you can reduce the voltage to the required 5V or 6V to safely operate the ESP32 and the motors.
Advantages:
- A lot of power for demanding projects.
- Ideal for longer runtimes.
Disadvantages:
- More expensive than other options.
- Slightly more complex wiring and setup compared to a power bank.
3. 18650 Lithium-Ion Batteries with Step-Down Converter
This is my preferred solution because it offers an excellent price-performance ratio and is very flexible. With three 18650 batteries, you get a voltage of over 12V, which is just about suitable for your TT motors. A step-down converter ensures that the voltage is safely reduced to 5V for the ESP32 module and other components.
Why three 18650 batteries?
- TT geared motors are designed for 6V but can easily be operated at a slightly higher voltage. With 12V, the motors run very fast and more powerfully, which is a lot of fun.
- In my previous projects, I’ve found that the motors remain stable even with this higher voltage, as they do not run continuously and have time to cool down in between.
- There is also always the option of tapping 5V via the step-down converter and running the TT geared motors at 5V.
Advantages:
- Cost-effective and easily available.
- Powerful and provides enough energy for all components.
Disadvantages:
- Slightly more complex wiring and setup compared to a power bank.
- The TT geared motors are supplied with a voltage outside the manufacturer’s specified range.
Additional Components to Consider
No matter which ESP32 power supply you choose, these components play an important role:
- L298N H-Bridge: For controlling the motors. It works ideally at voltages between 5V and 12V.
- PCA9685 Servo Controller: Allows you to control multiple servos with a stable 5V power supply via the extra connection on the servo controller.
Summary
For my robot cars, I prefer to use three 18650 batteries with a step-down converter. This solution offers an optimal balance of performance and cost. It provides enough voltage for the motors without overloading them, and ensures that the ESP32 module and other components work reliably.
With this ESP32 power supply, nothing stands in the way of your robot car! In the next article, I’ll explain how to proceed with the wiring.
Artikel Übersicht ESP32 Roboter Auto:
ESP32 Dev Kit C V4 – Build Your Own Robot Car – Project KickoffESP32 Dev Kit C V4 – Build Your Own Robot Car – Electronics and Components
ESP32 Dev Kit C V4 – Build Your Own Robot Car – Chassis Examples
ESP32 Dev Kit C V4 – Build Your Own Robot Car – Power Supply
ESP32 Dev Kit C V4 – Build Your Own Robot Car – Power Supply Wiring
ESP32 Dev Kit C V4 – Build Your Own Robot Car – Logical Wiring
ESP32 Dev Kit C V4 – Build Your Own Robot Car – Setting Up the Arduino Development Environment
ESP32 Dev Kit C V4 – Build Your Own Robot Car – The Robot Software


Recent Comments