This article is the first in a series of articles that describe step by step how to build a small robot car with live video image transmission. I published this series because I am very enthusiastic about the topic of robots and especially moving robots. The idea is to make the robot car described here as cheap as possible. Therefore I hope to reach a large target group with my detailed instructions and the selected components for a cheap model. I would like to present you my idea for a robot model which uses an ESP32-CAM, a small computer with camera and W-LAN. With the so called ESP32-CAM it is possible for about 5,- Euro to transmit a live video image, the view from the robot car, over a W-LAN connection. Because the small ESP32-CAM has a WIFI and Bluetooth module, the video image can also be sent to a smartphone or laptop over greater distances thanks to the additional antenna included.
Therefore, this series of articles is again aimed at teachers and students who would like to build a robot themselves. But of course all others who find the topic robotics interesting are invited to build their own little robots with the help of this building instruction.
Necessary components for the ESP32-CAM robot
I try to use very cheap components in this manual to enable as many interested people as possible to enter the world of small robots with the ESP32-Cam module. Cheap in this case means that the components have been selected in such a way that if they are ordered directly in China, the costs are about 15,- Euro. With these 15,- Euro the power supply is done by very simple Mignon batteries. However I would always recommend a power bank which is much more expensive than the intended 15,- Euro.
Note: If the components are purchased in Germany, e.g. via Amazon, this is of course usually much faster if the shipment is really from Europe but then also at a much higher price.
Here follows the Amazon Affiliate order overview. I personally often buy directly from Ali-Express in China.
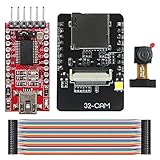
The following ESP32-CAM module comes with a FT232RL adapter, a so called USB to TTL Serial Adapter. This adapter is needed to connect the ESP32-CAM module to the PC for programming. Without such an adapter it is not possible to install the necessary programs on the ESP32-CAM module.
I have made very good experiences with the following motor driver and have already used it in a lot of robots with e.g. Raspberry Pi or ESP8266 NodeMCU robots. It is ideal because it shows the switching state of the H-bridge via the LEDs and so programming errors can be found quickly.
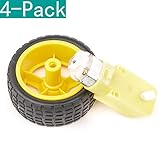
Here again the small yellow motors that are needed to drive the robot. For the model I describe in this small series two motors are sufficient.
To control the motor driver a servo controller is required. Here I always recommend the servo controller with PCA9685 chip because there are great libraries from Adafruit for this.
Cables & Co
Furthermore, jumper cables are required if not already available or included in the ESP32-CAM package. A USB cable which can be cut off from e.g. an old keyboard has also proved to be very useful. A good source for such old USB cables that can be cut is e.g. the local recycling center and there the container for the electronic waste. This cut off USB cable is used to supply power to the engine driver and, depending on the design, also to the ESP32-CAM.
The following components are required if no Power Bank is used.
If no Power Bank is used then this Step-Down Converter with two USB ports is required. This converter converts a voltage of about 7.2V into the necessary 5V to operate the electronics in the robot car.
For the robot car one of these battery holders with six mignon batteries is needed. The six batteries then supply the robot car with a sufficiently high voltage to enable the 5V power supply via the step-down converter listed above.
If all components are available it can go on.
Summary
With this series of articles a small robot is to be created, which is remote controlled and transmits a live video image. If the basic principle of how such a robot is built and programmed is understood then many more robots or similar applications are possible. So I talked with a well-known one about how a flap with video surveillance for the chicken house could be implemented. First of all it is important to get familiar with the world of electronics and the necessary programming environment. Exactly for these topics I would like to give a short instruction here.
In the next article the development environment is set up so that the ESP32-CAM module can be programmed.
Article Overview ESP32-CAM Robot Auto:
ESP32-CAM building your own robot car with live video streaming – project startESP32-CAM building your own robot car with live video streaming – Set up development environment
ESP32-CAM building your own robot car with live video streaming – USB-serial adapter wiring
ESP32-CAM building your own robot car with live video streaming – Installing the live video streaming software
ESP32-CAM building your own robot car with live video streaming – Design of the chassis
ESP32-CAM building your own robot car with live video streaming – Cabling in general
ESP32-CAM building your own robot car with live video streaming – Wiring the I²C hub
ESP32-CAM building your own robot car with live video streaming – robo car example programs
ESP32-CAM building your own robot car with live video streaming – programming the WIFI remote control
ESP32-CAM building your own robot car with live video streaming – connect external WIFI antenna


Recent Comments