


The previous post described how to setup the base unit and how the base unit transmit the GPS data. Now it is time to setup the mobile unit which is a part of the robot. The main difference between the base unit and the mobile unit is, that the mobile unit receives the GPS data from the base unit. In combination with the GPS data the mobile unit receives it is possible to calculate with the RTK library a very precise position. The setup of the mobile unit is very easy. First you have to create an image from the base unit. Copy the image on a new micro-SD card for the mobile unit. This copied image is the starting point for the configuration of the mobile unit.
The mobile unit is placed in a lunch box as I did it with the base station. This lunch box will be placed into the robot. The plastic of the lunch box is very easy to machine and to drill holes into the box without cracks. The following picture shows the mobile unit and the base station. For both units I used the RasPiGNSS GPS module from www.drfasching.at.

Now power up the mobile unit. First you have to change the host name from base station “bstation” to something like mobile station or “mstation”. Everything is installed from the RTK library and the modules for the GPS module itself. Now we are able to start with the configuration of the mobile unit.
We will use the second GPS antenna “Tallysman™ TW-4421” for the mobile unit. The mobile unit will also get an XBee Pro module S1 like the base station did for the communication of both unit. The GPS raw data will be transferred over the XBee module. But for the beginning we will use the WIFI connection for communication.
The following picture shows the setup of both stations.

The precondition for the operation of the mobile unit is, that the mobile unit receives the GPS data stream from the base station. As I explained in the post “theoretical setup” both units need a radio connection to communicate with each other. As described in the post Base Station the configuration was done in the file “/usr/bin/rtkbase” how the units should communicate to each other.
Mobile station – software setup
This chapter describes how to configure the GPS receiver and the RTKRCV (Real Time Positioning Programm) program and to run the program on the mobile unit.
RasPiGNSS Modul initialize
Before you could use the RasPiGNSS module together with the RTL library you have to initialize the module in the BINR mode. To do so you find some scripts in the folder “/usr/etc/” which are a part of the RPGTOOLS from www.drfasching.at. The best way for a secure initialization you will run the scripts after each reboot as we do it on the base station as well. I did the configuration for starting the module in BINR mode once again in the rc.local configuration.
To edit the /ect/rc.local for configuration please us the following command.
Command: sudo nano /etc/rc.local
Please at the following lines at the end of the rc.local config file and save the changes.
(/bin/sleep 5 && /usr/bin/nvsctl -v reset)
(/bin/sleep 7 && /usr/bin/nvsmode -v binr)
(/bin/sleep 9 && /usr/bin/binrcmd -v /home/pi/gnss/rpgtools/etc/init.cmd)
(/bin/sleep 11 && /usr/bin/rtkrcv -s -p 23 -m 24 -o /home/pi/gnss/rtkrover.conf &)
Now the rc.local on your mobile unit should look like my config file as shown below. With this changes the RasPiGNSS Module should start in the correct mode.
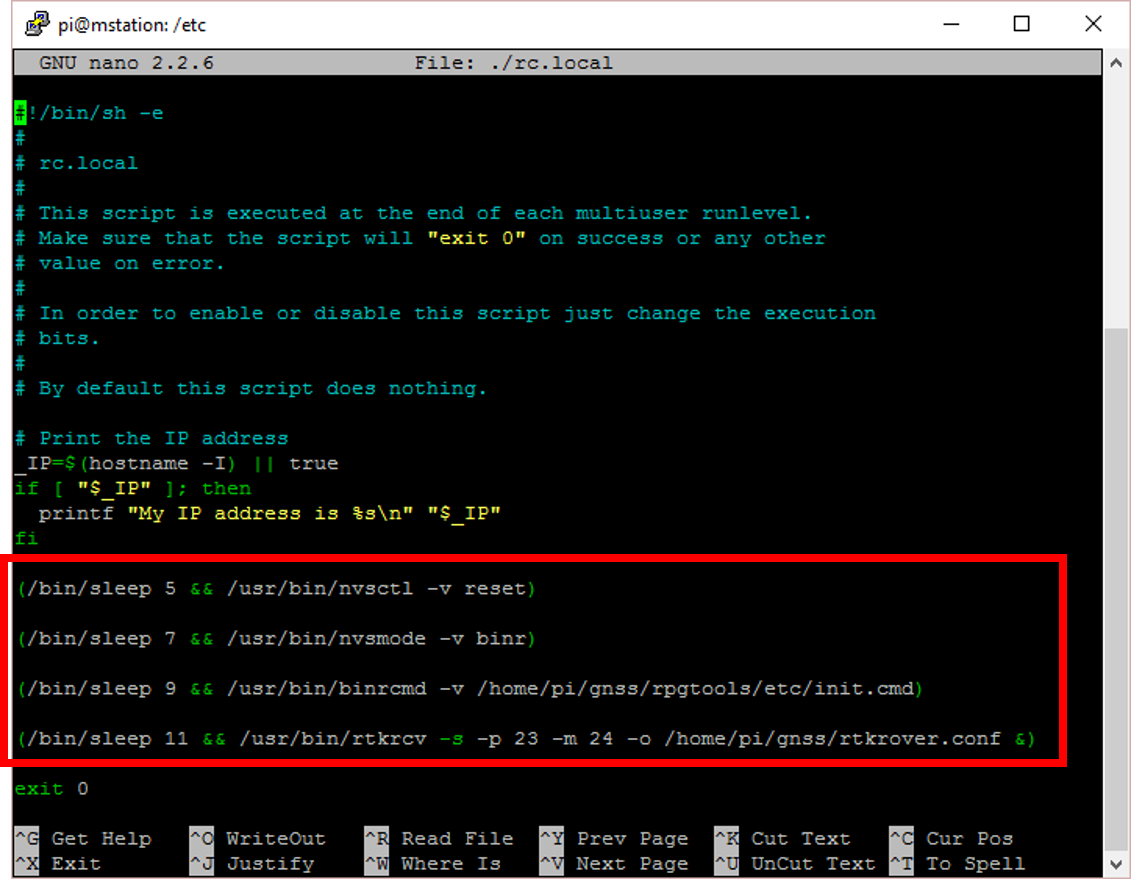
RasPiGNSS – rc-local mobile EinheitThe last line “/usr/bin/rtkrcv -s -p 23 -m 24 -o /home/pi/gnss/rtkrover.conf” starts the program rtkrcv for the calculation of the RTK position of the mobile unit. You could connect via telnet from any computer with the RTKRCV program (<IP Adresse> <Port>).
Note: telnet client
If you would like to close the rtkrcv telnet connection please type “exit” in the telnet window / telnet client. If you do not type exit and you close the window anyway you will be not able to reconnect. Only after a restart of the program rtkrcv you will be able to connect again via telnet.
You could read much more about the initialization of the RasPiGNSS GPS module on the website www.drfasching.at.
Note: Check BINR Mode
The RasPiGNSS module has to be configured in BINR mode on the mobile and base station. To setup the module in BINR mode you could use the commands explained above. It is possible to check with the following command if the module is running in BINR mode.
Command: stty -aF /dev/ttyAMA0
The following picture which shows the output of the command on my base station the baud rate shows up with “230400” bps. With this rate it is for sure that the module runs in BINR mode and not in the NMEA mode which has a baud rate of 115200. You should see the BINR baud rate of “230400” as well on your mobile unit.
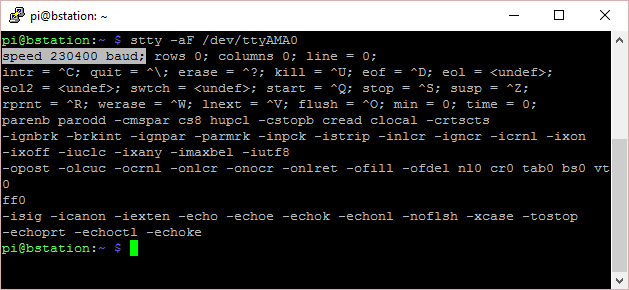
RasPiGNSS Module – BINR Mode
After initialization the GPS module in BINR mode you could now use the RTKRCV program to calculate the precise GPS position of your mobile unit.
RTKRCV program – a short introduction
You will run on your mobile unit the RTKRCV (Real Time Positioning Program) program. This program needs a configuration file. I used the name rtkrover.conf for the config file. This file describes how the calculation of the positioning should be done by the rtkrcv program. Inside this file the two GPS input streams are configured. One streams is send by the base station to the mobile unit and the other streams is generated by the RasPiGNSS module of the mobile unit itself.
Inside the rtkrcv.conf or rtkrover.conf configuration file is the knowledge configured how the real time positioning should be calculated. You do not only need this file to start the calculation you need this configuration file to configure and optimize the calculation of your position in the best way you need it.
Options RTKRCV program
In der rtkrcv.conf Datei oder bei mir mit dem Namen rtkrover.conf Datei steckt das Wissen, dass benötigt wird um die Echtzeitpositionierung nicht nur starten zu können sondern diese auch noch so gut wie möglich durch die diversen Konfigurationen zu machen.
You could use the following parameters to start the RTKRCV program:
| -s | start RTK server on program startup |
| -p port | port number for telnet console |
| -m port | port number for monitor stream |
| -d dev | terminal device for console |
| -o file | configuration file |
| -r level | output solution status file (0:off,1:states,2:residuals) |
| -t level | debug trace level (0:off,1-5:on) |
For more details please habe a look into the manual of the RTK library which is available here: RTKLIB
RTKRCV program Manuela start
If you started the rtkrcv program manually you are now in the terminal of the program. To use and control the program a few commands are available. To show a list of all the available commands just type “h” into the terminal. A short help with a list of all commands will appear in the window. You could use all these commands as well when you are connected via telnet as well.
RTKRCV program automatic start
With the first parameter –s the RTKRCV server will be started automatically after starting the program. This parameter is very important when you will start the program via a script after each reboot of the Raspberry Pi. I already explained this in the chapter above in which I described how to configure the rc.local.
With the second parameter –p the terminal is started which is available on port 295ß via telnet (telnet <IP-Adresse>:2950). This enable you to control the rtkrcv program via telent without sitting in front of the mobile unit.
I always use a thired command “-o /home/pi/gnss/rtkrover.conf” to load the configuration file rtkrover.conf which is located in the folder “/home/pi/gnss/rtkrover.conf”. With the –o parameter all the configurations are loaded automatically during the start up process of the RTKRCV program.
command: sudo /usr/bin/rtkrcv -s -p 23 -m 24 -o /home/pi/gnss/rtkrover.conf
With the command „stream“ executed inside the RTKRCV terminal you could check the streams received by the mobile unit. You should see one stream from the base station and one stream from the mobile unit itself. This is always one of the first commands I execute to check if everything is working well.
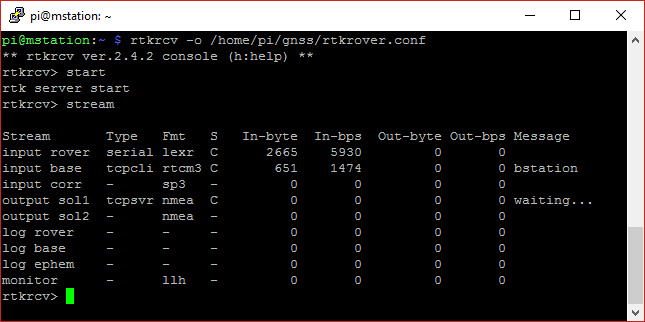
Terminal – RTKRCV Streams
RTKRCV IN-stream – TCP/IP or serial
So that the RTKRCV server could work as it should the configuration file rtkrover.conf has to be configured. I stored the file inside the folder “/home/pi/gnss/rtkrover.conf”. In the next chapter I explain the setup of the GPS streams inside the rtkrover.conf file thereby the mobile station is able to receive the GPS stream from the base station..
First I explain the setup that the GPS raw data stream (NVS) from the base station could be received with the wifi module via TCP/IP. The next few lines describe the configuration inside the rtkrover.conf file.
# Base input – TCPIP Stream NVS
inpstr2-type =tcpcli # (0:off,1:serial,2:file,3:tcpsvr,4:tcpcli,7:ntripcli,8:ftp,9:http)
inpstr2-path =bstation:5800
inpstr2-format =nvs # (0:rtcm2,1:rtcm3,2:oem4,3:oem3,4:ubx,5:ss2,6:hemis,7:skytraq,8:gw10,9:javad,10:nvs,15:sp3)
Second I describe how it is possible to receive the GPS data stream via the serial interface. For communication over the serial interface I installed the XBee module. The GPS signal is received via a RTCM3 stream. The next few lines describe the configuration inside the rtkrover.conf file.
# Base input – XBee Module
inpstr2-type =serial # (0:off,1:serial,2:file,3:tcpsvr,4:tcpcli,7:ntripcli,8:ftp,9:http)
inpstr2-path =ttyUSB0:115200:8:n:1:off
inpstr2-format =rtcm3
inpstr2-nmeareq =off # (0:off,1:latlon,2:single)
inpstr2-nmealat =0 # (deg)
inpstr2-nmealon =0 # (deg)
Depending of you configuration the mobile unit could receive the raw data for example over the TCP/IP protocol or via the serial interface as a RTCM3 data stream.
RTKRCV OUT-Stream – NMEA
Inside the rtkrover.conf configuration file the out stream of the mobile unit is setup. The NMEA out stream provide the precise position of your mobile unit. The NEMA stream is configured as follows.
# Output 1
outstr1-type =tcpsvr # (0:off,1:serial,2:file,3:tcpsvr,4:tcpcli,6:ntripsvr)
outstr1-path =:2947
outstr1-format =nmea # (0:llh,1:xyz,2:enu,3:nmea)
However, the stream is not working very well. As you see in the picture below showing the telnet client output many gaps are inside the stream with no GPS information about the actual position. This gaps occur because the mobile unit does not have a fix position calculated. The calculation of the precise NMEA stream jumps between a Fix, SBAS or Float solution. Each time the solution status changes I see gaps in the NMEA stream. To get a fix or float solution depends on the number of satellite you receive and how good the received GPS signal is.

telnet – NMEA Stream
Output RTKRCV Fix Solution
The next picture shows the „status“ command executed inside the RTKRCV program terminal. The pictures shows that at this time I took the screenshot a Fix Solution was found. This should enable my robot to navigate very precise in the future. The command to show all this information in the RTKRCV terminal is “status”.
Command: status
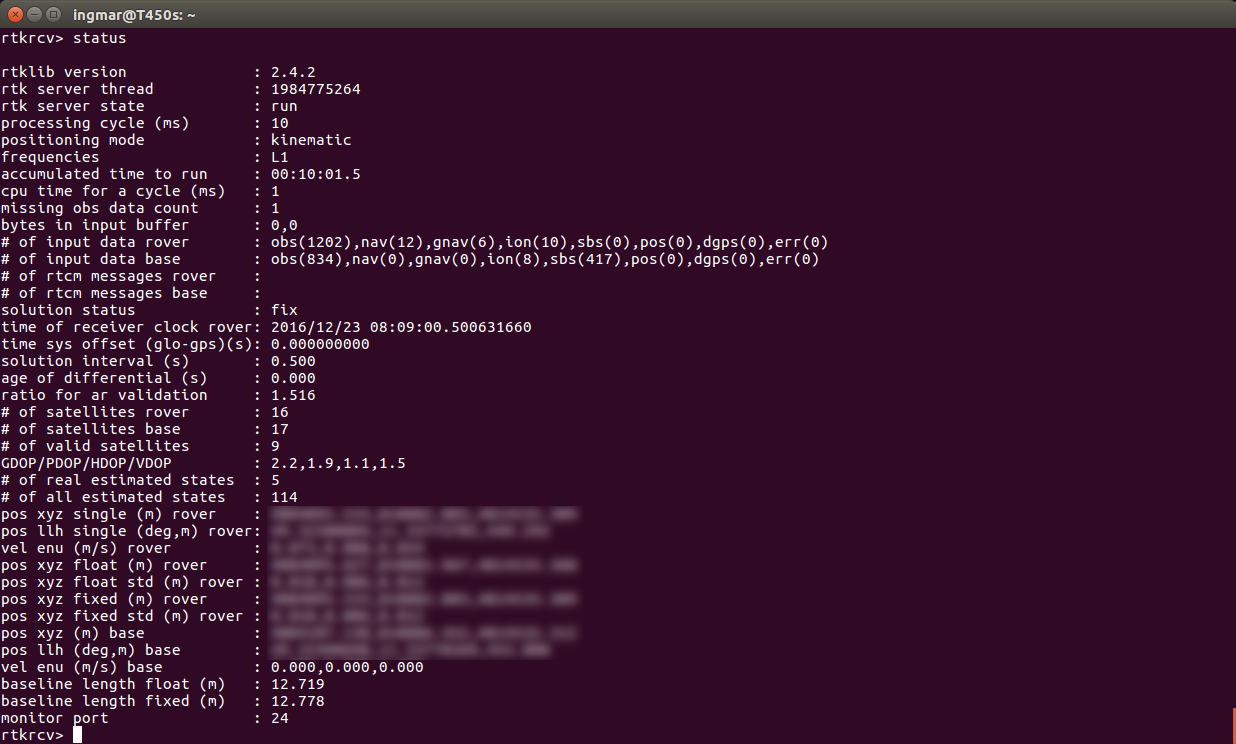
RTK FIX Solution
Summary
With the setup of the base station and mobile unit the system is ready and working. Depending on the number of satellite the system is receiving the calculation of a SBAS solution is very fast calculated. After a period of 15 minutes the system normally calculates a floating solution or fix solution. But the floating solution or fix solution is not very stable. The system switches between the floating and fix solution very often. All I have to do next is hopefully tuning the system. Maybe I will implement a fall back solution with a simple GPS mouse connected via USB to the Raspberry Pi in my mobile unit. I will only use this fall back solution if the RTK setup is not able to calculate a precise solution at all. Maybe I will use the following GPS mouse I already bought as a fall back system.
Article list - GPS module RasPiGNSS:
Precise GPS GNSS positioning with a Raspberry Pi and the RTKLIB – introductionPrecise GPS GNSS positioning with a Raspberry Pi and the RTKLIB – theoretical setup
Precise GPS GNSS positioning with a Raspberry Pi and the RTKLIB – GPS antenna setup
Precise GPS GNSS positioning with a Raspberry Pi and the RTKLIB – software installation
Precise GPS GNSS positioning with a Raspberry Pi and the RTKLIB – configuration RTKLIB base station
Precise GPS GNSS positioning with a Raspberry Pi and the RTKLIB – configuration RTKLIB mobile unit
Precise GPS GNSS positioning with a Raspberry Pi and the RTKLIB – XBee serial data transmission


Recent Comments