The Raspberry Pi camera was mounted without a case on my robot car. But the robot is designed to operate in the field and this is the reason why the camera needs a case to protect the module from weather influences. I had the idea to by a surface box which costs only a few cents. The hardware store has a wide selection of surface boxes and I bought the smallest one which is made from very soft plastic.
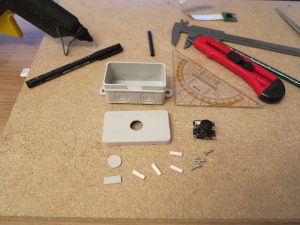
I was cutting into the cover of the surface box a small hole for the camera lens. I always recommend to use a camera with a fish eye lens for robot cars because of the wide viewing angle. The following pictures shows the surface box and small white pins and in the back of the picture a black long pin. These pins are used as base for the camera module. For the white CSI camera cable I cut a small slot into the case beneath the cover. With the slot in the case I am now able to lead out the CSI ribbon without bending the ribbon.
Hint:
If you wish to build a camera case out of such a small surface box do not cut the hole for the lens in the middle of the cover. Cut the hole a little bit on top of the cover. This will give you more space for the CSI ribbon to lead it out of the box with absolutely no bending of the cable if you close after wards the surface box. In my case the ribbon is bended a little too much to my mind.
Ad-link – fish eye camera
Below the ad-link to the Amazon online store which will you guide directly to the fish eye camera I typically use form y robot cars. I use this type of camera in my robot projects and the camera works perfect.
Camera mounting:
To mount the camera into the surface box was very easy. I cut of pins with a total length of 13mm of the black and white plastic stick. I decided to use pins with a length of 13mm because the lens should stand out of the cover 2mm. I used a hot glue gun to glue the pins into the surface box. The pins sit very firmly in the case and it is easy to mount the camera module on top of the pins with small screws. If I need the camera module for another project it will be very easy to screw out the screws. The next picture shows the mounted camera module on top of the pins.
After screwing the camera module into the surface box I closed the box and mounted the surface box with a plastic pipe from the construction market on top of my robot. With this kind of plastic pipes it is very easy to build constructions like the one I mounted the box on. My camera case looks like shown on the picture below.
After mounting the camera on the Raspberry Pi robot I adjusted the camera. To adjust the camera is very easy with the pipe construction I build. Maybe I will mount a micro servo-motor into the surface box to turn the camera up and down. This should be very easy.
Build your own robot car with the Raspberry Pi!
Step by step to your own robot carThis book guides you in two parts through the project phases with the aim of building an individual, autonomously driving robot car. In the first part of the book you will learn the basics of robotics and the interaction of hardware, electricity and software. You build the chassis and wire the individual components - details can be found in the appropriate, richly illustrated chapters. An introduction to software installation and programming with Scratch and Python completes the first part. You do not need any previous knowledge in robotics and programming. In the second part of the book, you will familiarize yourself with the sensors required for autonomous driving. With the acquired knowledge you can individualize and further develop your robot car as you wish. The knowledge you acquire in this book will enable you to implement your own projects with the Raspberry Pi.
This book offers you that:
- Simply get into robotics with the Rasperberry Pi without prior knowledge
- Numerous illustrations, tables, circuit diagrams
- Information boxes with useful tips also for other Raspberry Pi projects
- Project code with syntax highlighting
- Two car projects: remote-controlled robot car via WLAN and self-driving car
- Hardware tips and recommendations for suitable accessories - Extensive project material as download: Raspbian image, parts list, chassis artwork and code
- Special features: Easy and robust cabling, use of high-precision time-of-flight laser distance measurement sensors, introduction to servo motors and suitable servo controllers, control via gamepad, use of an OLED display
Ingmar Stapel studied computer engineering and is currently working internationally as IT project manager and enterprise technical architect; in addition, he has been intensively involved with Raspberry Pi and robotics for years. He likes to share this knowledge with interested people from the tinkering scene at meet-ups on robotics. On his private blogs he also writes about many current technology trends.
The next pictures shows the camera mounted above the robots teeth.
The following pictures shows the front of my robot.
Summary:
I am very happy with the cheap and water proof camera case I build for a few cent. Maybe I will install a few IR LEDs into the cover of the surface box. Then with an IR version of the Raspberry Pi camera module I will be able to see at night.
Article list - Big Rob:
Big Rob – Raspberry Pi robotBig Rob – Raspberry Pi robot power train
Big Rob – Raspberry Pi robot motor driver BTS7960B and Python program
Big Rob – Raspberry Pi robot outdoor camera
Big Rob – Raspberry Pi robot with differential GPS
Big Rob – Raspberry Pi robot with nice teeth
Big Rob – Raspberry Pi robot Peak Power Pack power supply
Big Rob – Raspberry Pi robot videos


Hi Ingmar,
Your projects are fascinating and i would like to build a Big Rob too!
To give a little support for your work, i am trying to get help from a friend with Paypal account to purchase your e-Book.
Do you have an e-Book for Big Rob?
I am looking for help to assemble Big Rob with:
1) Camera
2) Battery pack power supply
Please let me know through my email!
Nice work and please keep sharing. I love Big Rob!