

All the components you need to build the robot atuo as described in my book “Build your own robot car with the Raspberry Pi!” can be found in the following list. The book itself is divided into two parts or construction phases. The first part describes a robot car that is remote controlled via the network and the second part extends the robot car to a fully autonomous driving robot car. Accordingly, the overview of the components is also divided into these two sections. If you want to do less tinkering and prefer to buy a finished kit, you can find different robot kits for the Raspberry Pi under the following link “Robot Kits” on my website.
Component list for a remote controlled robot Car
The component list is updated by me again and again to ensure that the parts are easy to find.

Roboter Auto Teil 1 2019
Robot car brain – Raspberry Pi 4 Model B (4GB RAM)
I recommend the Raspberry Pi 4 model B with 4GB RAM. The Raspberry Pi 4 model B is the latest model and in the version with 4GB RAM it can also be used as a full-fledged desktop computer beside the robot car. So it is easy to get first experiences with Linux with the big model or to program directly on the Raspberry Pi. The Raspberry Pi 4 is equipped with WIFI, Bluetooth, USB 3.0 ports and a GBit network connection.
Micro SD-Card 32 GB
Bei der micro SD-Karte ist es wichtig das Sie sich ein schnelles Modell kaufen. Es sollte ca. 20 MB/s schreiben können damit das Betriebssystem des Raspberry Pi nach dem Einschalten auch zügig geladen werden kann. Ich füge nachfolgend ein Modell auf aber es lohnt sich selber noch zu suchen da sich die Preise und die Angebote ständig ändern.
Raspberry Pi – Cameras at a glance
The latest Raspberry Pi camera has the version number 2.1. This camera module has an internal chip from Sony and takes a very nice picture. The new module is perfectly supported by Raspbian just like the previous module. I use the normal camera module and the NoIR module. The NoIR module is well suited for low light conditions. The Raspberry Pi camera module with wide angle lens is very well suited for the robot car because it captures a larger field of view than the modules with standard lens. Below are the two current camera modules and one with wide angle lens.
Standard RGB camera:
NoIR camera
Wide angle camera (my recommendation)
Most of the time, the wide-wiklen cameras for the Raspberry Pi still use the old chipset of version 1.3. My experience has shown that a wide angle camera is very good for the robot car but it doesn’t necessarily have to be version 2.1 of the camera module.
Motor driver L298N H-Bridge
For the drive of the small robot car, an H-bridge with which up to two motors can be controlled in speed is very well suited. There are two models of the motor driver which I use again and again. One is small and compact and the other one is a bit bigger but has LEDs which show the switching state of the H-bridge. I mainly use the module with the LEDs. Technically the two modules do not differ in size.
Motor driver with LEDs (my recommendation)
Compact motor driver without LEDs
Step-Down Converter (my recommendation)
In order to supply the Raspberry Pi with power, it is advisable to use a step-down converter. The module I recommend has two USB ports and can deliver up to 3A at 5V. So it is very well suited for the Raspberry Pi 4.
Motors
There are different motors with which you can drive a robot car. Very popular and used by me are the yellow DC motors which come with a matching wheel. These yellow motors are also often available together with a chassis made of acrylic glass. Furthermore I have installed the Tamiya 70168 gear motors which generate a lot of power and make it very audible.
Chassis with motors (my recommendation)
I recommend this chassis that comes with four motors and two acrylic glass plates that form the base for the robot car. I have built several robots of this type of chassis and have always been very satisfied.
Standard motors (my recommendation)
Who only needs the engines can also buy them without chassis.
Tamiya 70168 very powerfull
I liked these Tamiya engines very much, because with them an individual robot car is quite easy to build.
Wheel mountings
I had searched for a long time until I found these couplings. With them you can mount normal wheels from RC-model construction on a shaft. I always found this solution very practical. Below are three of these couplings so that you have an idea which types are available.
Power supply
From my experience you should run the robot car with power from a battery. The power supply works best with a normal RC battery. The RC battery has the advantage that the robot car drives much longer and the battery can be charged quickly with the corresponding charger. I do not recommend the use of batteries for building the robot car with the powerful Raspberry Pi 4 Model B.
RC battery solution (my recommendation)
I have now been using these batteries for about 2 years and am still very satisfied. They supply my small robot models reliably with power
In addition to these batteries I have bought the following charger. It charges the batteries with the 4A very fast and reliable.
You are also always well advised to have a few of these plugs at home. So I have soldered some cables myself and installed them in the different robot models. Because unscrewing and connecting them again and again is not good for the screws at the motor driver in the long run.
External power supply unit
For the stationary operation of the robot car I use exactly this external power supply. I have had it for years and it works reliably for very different applications. Thanks to the adjusting wheel I can adjust the output voltage with 5, 6, 7.5, 9, 12, 13.5, 15V to my individual needs.
Wires
The different cables are needed to connect the electronic components like the motor driver to the Raspberry Pi as well as the motors. It can never hurt to have a few more cables.
Spacers
These small brass spacers are very suitable for mounting electronic components such as the Raspberry Pi or the motor driver. With the box offered here you have a wide range of different lengths at your disposal.
All components for an autonomously driving robot car
If you want to develop the robot car from the first part of the book to an autonomous driving robot, you will need the following components. With a Time of Flight sensor that can measure distances with a laser, you can detect obstacles in front of the robot car early. The Raspberry Pi Sense-HAT supports your robot car with its various sensors to keep its orientation while driving.
The following picture shows the autonomous driving robot car with GPS receiver, Raspberry Pi Sense-HAT and Time of Flight sensor.
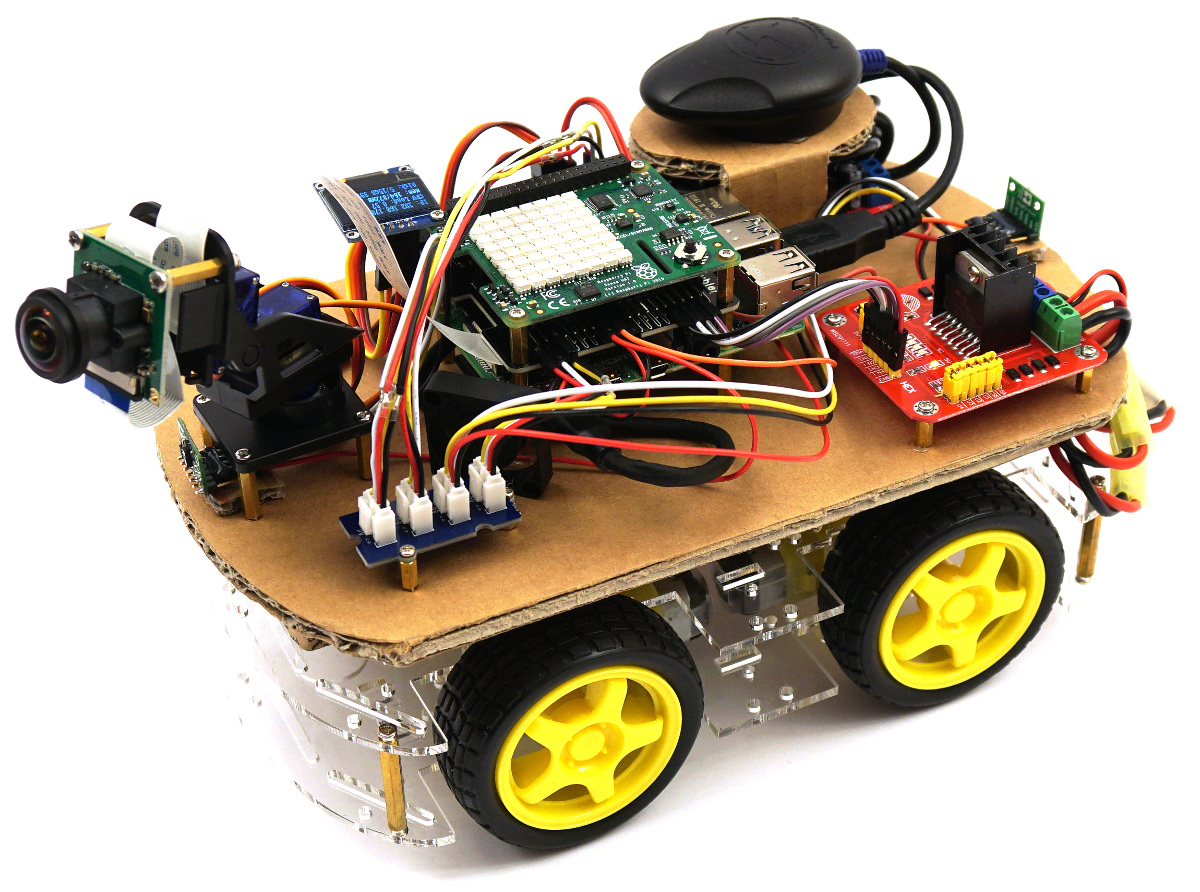
Roboter Auto Teil 2 2019
Raspberry Pi Sense-HAT
In order for the robot car to drive properly autonomously, it needs a gyroscope. This is integrated in the Raspberry Pi Sense-HAT and helps to orient and monitor the rotation of the robot car. The magnetometer of the Sense-HAT is used when the robot drives GPS controlled.
Time of Flight Sensor
With the Time of Flight Sensor from Pololu you can reliably and in a quick sequence detect obstacles in front of the robot car early. Since this sensor is connected via the I²C bus of the Rasbperry Pi, it is very well suited for use in the robot car as described in my book.
Seeed Studio Grove – I2C-Hub
With the I²C Hub from Grove, you save the workers from having to build a hub themselves. With its plug system it also offers a loose contact free possibility to connect the different sensors to the I²C bus of the Raspberry Pis.
Seeed Studio Grove – I2C-Wires
With this set of cables you can connect all sensors that are connected to the robot car as described in my book. As the cables are quite long, can they be shortened individually?
GPS-Receiver
I have tried several GPS receivers and list the two GPS modules that worked for me under Raspbian without problems. I recommend the Navilock GPS receiver NL-602U USB because it convinced me by its speed and accuracy.
Navilock NL-602U USB (my recommendation)
167 Kanal USB GPS Receiver – SkyTraQ Venus8
Servo controller
There are different models of the servo controller. I recommend to buy the cheaper model, because it works exactly like the much more expensive model from Adafruit which you can see in my book.
The servo controller from Adafruit is much more expensive but it would be the model I used.
Port-Doubler
With the Port-Doubler you can extend the ports of your Raspberry Pi computer and easily connect the Raspberry Pi Sense-HAT and other components to the still free and 90° rotated connector strip.
Pan Tilt-Kit
When the Raspberry Pi camera is mounted on the Pan and Tilt Kit it can also change the angle of view up and down as well as sideways. The robot car does not have to move but can stand still.
OLED Display
With the OLED display, important information such as the current IP address of the robot car can be displayed immediately after switching on.
Game-Pad
Who would like to control his robot car with a game-pad can buy for example the following game-pad. I have tried this one next to a PS4 controller and it worked well.


Recent Comments