Preparing the Jetson Nano:
The first step is to write the official and latest image from NVIDIA for the Jetson Nano Board to an SD card. For this manual I used the image with the version “jetson-nano-sd-r32.2.1.zip”.
The latest image file can always be found on the NVIDA website at the following URL: https://developer.nvidia.com/embedded/learn/get-started-jetson-nano-devkit#write
You should write the image file to a fast Mirco-SD card that is at least 32GB in size if you do not plan to use an SSD hard drive. If you are using an SSD hard disk then a 16 GB SD card with normal speed is also sufficient. Then insert the SD card to which you have uploaded the image into the Jetson Nano board, connect the board to a monitor, mouse, keyboard and switch it on (establish power supply of the Jetson Nano via micro-USB connector).
The first steps of the Ubuntu installation on the Jetson Nano are quite simple. Once the language and the keyboard layout must be defined. Then a connection is established to the own network via WIFI USB adapter. An alternative is of course the LAN cable. But this doesn’t really make sense on a donkey car.
The following USB WIFI adapter worked perfectly on my Jetson Nano.
But the Intel plug-in module that is installed under the board of the Jetson Nano is highly recommended. With the two antennas the reception is much better and the Intel module is better supported by the drivers and didn’t cause me any problems at all.
Note – Start network automatically:
So that a network connection via the WIFI USB adapter or the Intel module is always automatically established to your own access point without you always having to enter user/password via a monitor/keyboard, I recommend the following configuration. To do this, you must set up your profile in the user settings so that your user automatically logs in under Ubuntu and thus also establishes the WIFI connection.
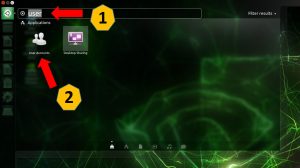
To customize the user account please click on the search icon in the upper left corner and search for “user” (1). Now click on the symbol for user accounts (2). The window with the existing user accounts opens.
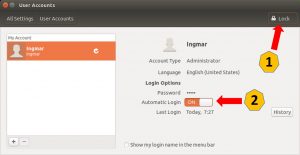
Now select the appropriate user who should log in automatically. To do this, use the admin password to unlock the profile (lock) in the top right corner (1). Then switch the “Automatic Login” switch to ON (2).
After everything has been configured, switch to the terminal window to continue with the software installation.
Install helpful tools:
To make the configuration of the donkey car a bit easier I always use the text editor Nano and the Midnight Commander. Both tools are installed on the Jetson Nano using the following commands.
The first thing you do is update the repository information. To do this, execute the following command.
Command: sudo apt-get update
Nano is the simple text editor I personally prefer. Therefore I recommend the installation at this point.
Command: sudo apt-get install nano
With the Midnight Commander you can easily edit or copy files in the Linux terminal without the need to know the necessary Linux commands.
Command: sudo apt-get install mc
After the update is done, the two tools “Nano” and “MC” are installed, the actual software installation for the Donkey Car Framework on the Jetson Nano begins.
SSD hard disk – recommended (but optional)
Since the demands of the donkey car on the hardware should not be underestimated, if the Jetson Nano is to be used to separate the neural network as well, I recommend a small SSD hard disk from which the operating system is booted. Because the 4 GB of Ram are not exactly a lot that the Jetson Nano brings along and a SWAP file in combination with a SSD hard drive brings a lot of speed and stability.
A very good guide can be found here how to move the installation from the SD card to the SSD hard disk and then boot the operating system from this SSD hard disk. I also bought the Samsung T5 SSD hard drive as recommended in this manual and I am very happy with this drive. Following again a link to the Amazon online shop.
Create SWAP file – strongly recommended
I have noticed that when I train the pilot for the donkey car on my Jetson Nano, the 4 GB of memory is quickly used up. Therefore I have created a 10GB SWAP file. If I train my pilot now, mostly about 8GB of the SWAP file are occupied. Therefore I recommend to create a SWAP file regardless of whether a SSD hard disk is used or not.
The following command creates a SWAP file with a size of 12GB.
Command: sudo fallocate -l 12G /var/swapfile
Now the correct rights must be set so that the SWAP file can be accessed.
Command: sudo chmod 600 /var/swapfile
Now the SWAP file is created in the previously specified full size.
Command: sudo mkswap /var/swapfile
With the following command the SWAP file is activated.
Command: sudo swapon /var/swapfile
To make sure that the SWAP file is available after each restart, the following command must be executed.
Command: sudo swapon /var/swapfile: sudo bash -c ‘echo “/var/swapfile swap swap defaults 0 0” >> /etc/fstab’
Now everything is set up and the Jetson Nano should be restarted.
Command: sudo swapon /var/swapfile: sudo reboot
Summary
When the Jetson Nano starts and automatically logs on to the network, the first step of preparation is successfully completed. I would like to point out once again that the use of an SSD hard disk really makes sense for this project. This reduces the likelihood of the micro SD card failing and the gain in speed is significant, especially later when training the neural network of the donkey car.
Donkey Car article series
Autonomously driving Nvidia Jetson Nano AI robot car – preparation
Autonomously driving Nvidia Jetson Nano AI robot car – software installation
Autonomously driving Nvidia Jetson Nano AI robot car – configuration of the Donkey Car Framework


Recent Comments