


In this post I show how to control a Nema stepper motor (17/23/34) via a web interface using an ESP8266 NodeMCU and a TB6600 stepper motor driver. The web interface lets you set the rotation speed of the motor and change the direction of rotation with buttons.
I need this stepper motor control to drive a turntable for a video and photo project at different speeds.
Here is a picture of the turntable as it currently looks.

Turntable stepper motor
The building instructions and the 3D print files originally come from this project: Audiomatica Open Source Turntable – codename “Medusa”
I adapted it to an ESP8266 NodeMCU with a web interface for controlling the turntable.
Project overview
The goal is to provide a web interface on an ESP8266 NodeMCU that lets us set the rotation speed of our Nema stepper motor and start and stop it. The control runs on an ESP8266 NodeMCU that connects to the local Wi-Fi. If no Wi-Fi is set up, it opens a hotspot (“ESP_Setup”) where you can configure the Wi-Fi credentials.
Features of the control:
- Adjust the speed with a slider
- Start/stop button for the motor
- Control left/right rotation with buttons
- Smooth ramp control for acceleration & deceleration
- Automatic Wi-Fi setup with WiFiManager
Required hardware:
- ESP8266 NodeMCU: microcontroller with Wi-Fi
- TB6600 stepper motor driver: drives the motor
- Stepper motor driver
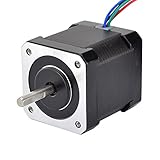
- Nema stepper motor: 17/23/34
- Stepper motor 12V / 2A
- External power supply: e.g. 12V for the stepper motor
- An ATX power supply like this one


Plus a few more components that make the build easier:
- 15×15 MakerBeam XL profile
- ATX breakout board
- On / off switch
- Lazy Susan turntable ball bearing
- GT2 belt 460 mm – 230 teeth


Hardware setup
For everything to work smoothly, the pin assignment should be as follows (*names refer to the NodeMCU pins*):
- STEP_PIN → D1 on the NodeMCU → STEP input on the TB6600
- DIR_PIN → D2 on the NodeMCU → DIR input on the TB6600
- EN_PIN → D3 on the NodeMCU → EN input on the TB6600 (active LOW signal)
Important:
- GND of the NodeMCU and the TB6600 must be connected.
- The stepper motor needs its own power supply (e.g. 12V or 24V).
- Make sure to use the correct current and voltage values for your motor (see data sheet).
Arduino code for the web control
Below is the complete Arduino sketch that you can copy into the Arduino IDE. Do not forget to install the ESP8266 board package and to add the WiFiManager library.
Download:
As soon as the software is stable enough, I will publish it on GitHub.
Explanation of the functions
Here are a few sentences on how it all works.
Wi-Fi management with WiFiManager
- If no saved Wi-Fi credentials are available, the ESP8266 starts its own hotspot (“ESP_Setup”).
- You can connect to the hotspot with a smartphone or laptop and configure the Wi-Fi.
- The data is saved, so the ESP connects automatically at the next restart.
Web interface control
- Start/stop buttons → switch the motor on and off
- Left/right rotation with buttons → the motor can turn in both directions
- Adjust the speed with a slider (0 – 100 %)
- Set the step size via a dropdown box
- Smooth acceleration (ramp) → prevents jerky starting and stopping
How the web interface works
Connecting to the web interface
- Enter the IP address of the ESP8266 in the browser
- The web interface loads
Using the functions
- Start & stop the motor with a button
- Control left/right rotation
- Adjust the speed (slider)
Change the Wi-Fi credentials (if needed)
- If you want to use a new Wi-Fi network, press the reset button on the ESP8266.
- The ESP restarts as a hotspot so you can configure the Wi-Fi credentials.
Conclusion
With this sketch and the described hardware setup, you can conveniently control the rotation speed and direction of your Nema stepper motor over Wi-Fi. Operation is simple via a web interface on your smartphone or PC.
- No additional display or buttons needed!
- Fully controllable via the browser!
- Flexibly expandable for more complex motion profiles!
💡 Possible extensions:
- Timer function to stop the motor automatically after x revolutions
- Different speed profiles (e.g. for video turntables)
- Integration of a servo for camera control
If you have questions or want to extend the project, feel free to write in the comments! Have fun trying it out! 😊🎯



Recent Comments