


The Jetson Nano is ideal for small weekend projects. A large number of projects have been created in recent months and are available online. I really liked the project that I found
on Medium under the following URL. This is an example from the field of face recognition. The small Jetson Nano from NVIDIA is ideal for this. I have described the project here on my blog and added a barrier and some subtleties. So it is possible to open or close the barrier depending on the access rights of a person / face.
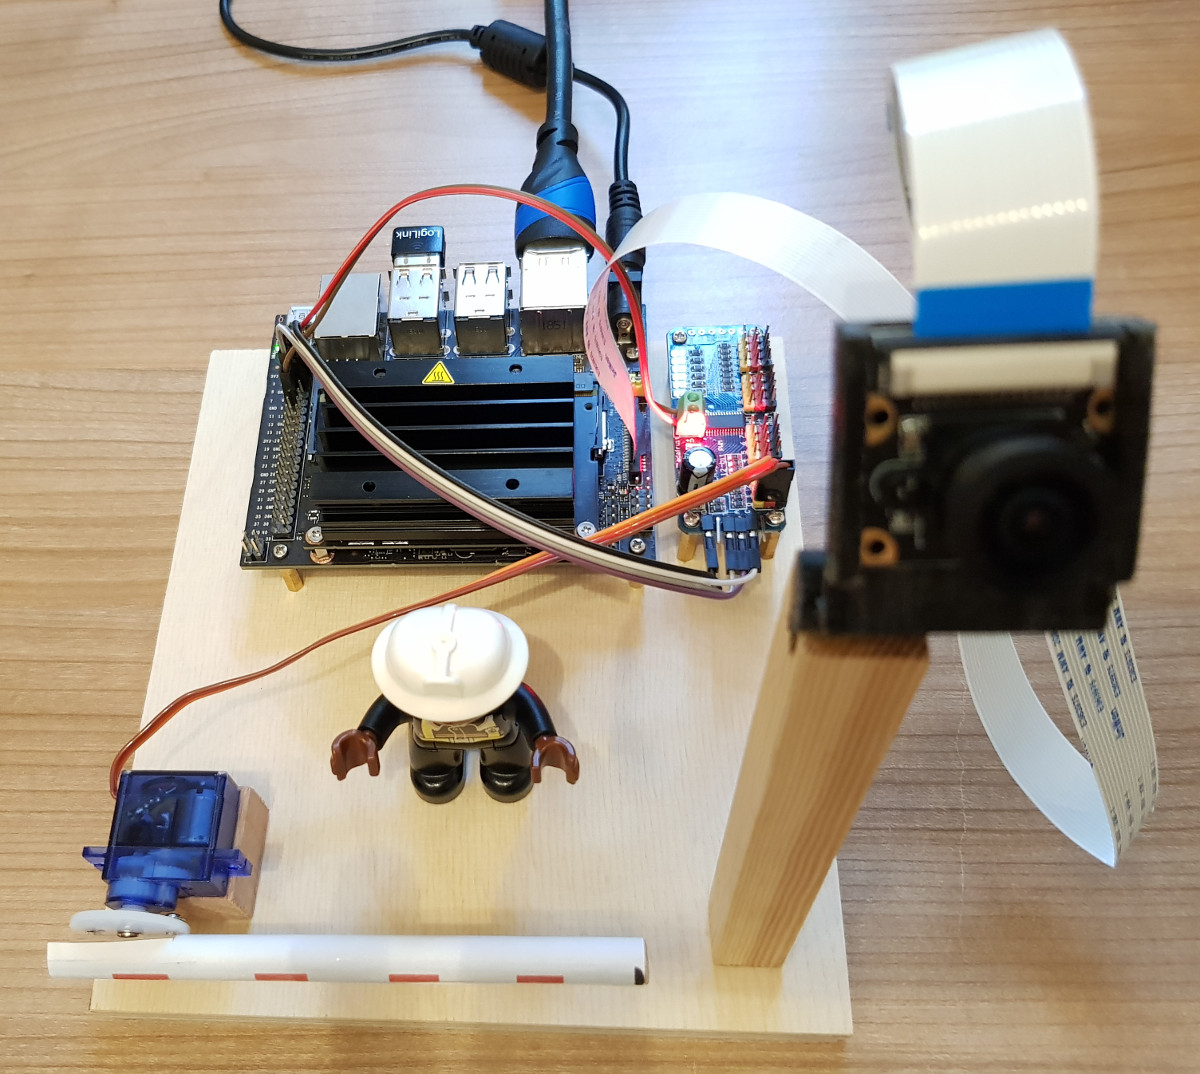
The following guide leads step by step through the project. In addition to the Jetson Nano and a CSI camera, a servo motor and servo controller are required. Below is the shopping list of the hardware needed for this project.
Jetson Nano Gesicht Erkennung und Zugangskontrolle
Shopping list for this project
The Jetson Nano is the heart of the project.
The micro SD card is required to install the operating system of the Jetson Nano.
Here the choice of the right CSI camera is important. The Raspberry Pi CSI camera version 2.1 works best.
The barrier is moved with the servo motor.
The PCA9685 servo controller ensures that the servo motor can be controlled.
The jumper cables are used to connect the servo controller to the I²C bus of the Jetson Nano.
Jetson Nano – Preparing the SD card
You should always download the latest image for the Jetson Nano from the NVIDIA site. For this manual the image named “” was used. The latest image can always be found under the following page:
URL: https://developer.nvidia.com/embedded/learn/get-started-jetson-nano-devkit#write
The image itself can be uploaded to a 32GB micro SD card using Win32DiskImager (Windows) or Etcher (Windows, MacOS and Linux). Both programs are available for download on the following page.
URL: https://sourceforge.net/projects/win32diskimager/
URL: https://www.balena.io/etcher/
After the image has been uploaded to the micro SD card and the Jetson Nano is connected to your W-LAN, you can continue to install the actual software for face recognition.
Jetson Nano – Software Installation
In this section I will explain which packages all need to be installed to be able to start on the Jetson Nano with face recognition. I will explain how a SWAP file can be set up and which library is needed to move a small barrier with a servo motor.
SWAP File – set up
Since the Jetson Nano with its 4GB Ram does not have much memory, creating a swap file helps to avoid problems that might occur because there is not enough memory available. The solution is a swap file with a size of 6GB which is created on the micro SD card. The creation of the swap file is done with the following commands which are executed in the terminal window.
Command: sudo fallocate -l 6G /var/swapfile
Command: sudo chmod 600 /var/swapfile
Command: sudo mkswap /var/swapfile
Command: sudo swapon /var/swapfile
Command: sudo bash -c 'echo "/var/swapfile swap swap defaults 0 0" >> /etc/fstab'
After all commands have been executed in sequence, please restart the Jetson Nano. The SWAP file is then available.
Installing Libaries and Libraries
The first step is to update the Ubuntu installation to the latest version. Please execute the following command.
Command: sudo apt-get update
A number of libraries are then installed. This installation takes a few minutes.
Command: sudo apt-get install python3-pip cmake libopenblas-dev liblapack-dev libjpeg-dev
The example is programmed in Python and uses numpy and therefore this library is needed additionally.
Command: pip3 install numpy
Since this example is about face recognition and we don’t have to or can’t invent everything ourselves, the dlib library is installed. This Deep Learning Library for face recognition relieves us of the work. The installation itself takes about 1 hour. It is therefore worthwhile to go out for a cup of coffee, for example, after the following command has been executed.
First of all, the library must be downloaded.
Command: wget http://dlib.net/files/dlib-19.17.tar.bz2
After the file is in the home directory, for example, it is unpacked.
Command: tar jxvf dlib-19.17.tar.bz2
Now change into the directory with the unzipped Dlib Library
Command: cd dlib-19.17
Unfortunately the installation cannot be started immediately on the Jetson Nano. There is still a small adjustment to be made to the “cudnn_dlibapi.cpp” file. The line that starts with the entry “forward_algo = forward_best_algo;” and is approximately at line number 854 must be commented out.
Command: gedit dlib/cuda/cudnn_dlibapi.cpp
The line should now look like this.
//forward_algo = forward_best_algo;
Now after saving the customization you can start with the actual installation of the dlib library.
Command: sudo python3 setup.py install
After the installation of all libraries needed for the face recognition software, the installation of the face recognition software itself follows. This is installed with the following command.
Command: sudo pip3 install face_recognition
After the installation has been completed everything would be installed so that faces can be recognized.
Adafruit Servo Controller Library
To control the small servo motor via the servo controller, the Adafruit servo controller library must be installed on the Jetson Nano. Please execute the following command.
Command: pip3 install Adafruit_PCA9685
The pin assignment of the I²C bus on the Jetson Nano is as shown in the following picture.
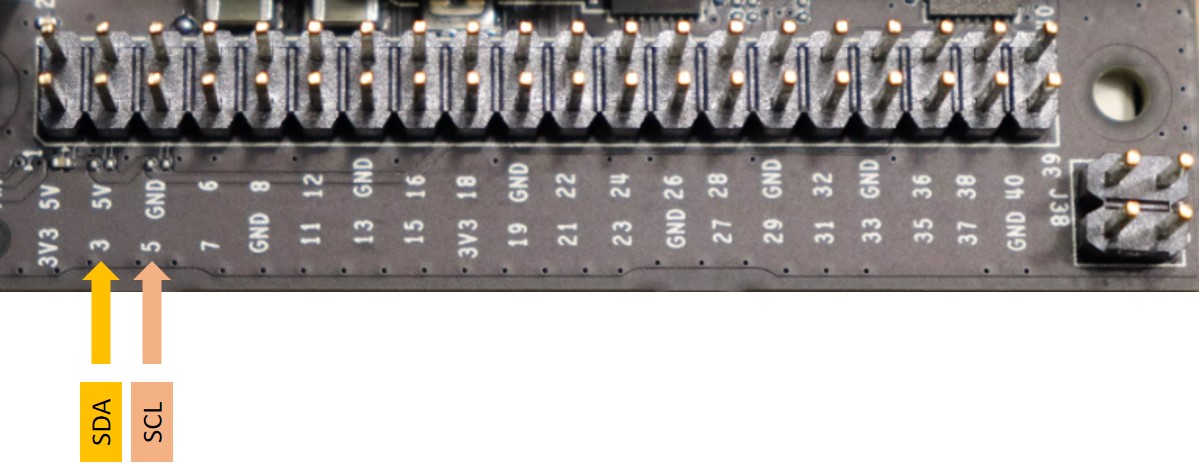
Jetson Nano I2C bus
Now the PCA9685 servo controller can be addressed via the I²C bus of the Jetson Nano. The following command can be used to check whether the servo controller has also been detected.
Command: sudo i2cdetect -y -r 1
To enable the user e.g. nano to access the I²C bus the following command must be executed.
Command: sudo usermod -a -G i2c <hier den usernamen eingeben>
Jetson Nano – Start face recognition
After the software installation is finished you have to download the sample program with the doorcam.py program file. This Python program is, so to say, the basis for face recognition at the door and with this program you can determine how often someone has been at the door or in front of the camera in the last few hours. With the following command the doorcam.py file can be downloaded.
Command: wget -O doorcam.py tiny.cc/doorcam
The program itself can also be downloaded from GitHub.
The face recognition software itself is started with the following command. Faces that are recognized are stored in the file known_faces.dat. The file known_faces.dat is always stored in the path from which the software is started.
Command: python3 doorcam.py
Doorcam.py – Modification access rights
In order that faces are not shown but a name and the status of the access right can be saved for each face, a small adjustment must be made to the program “doorcam.py”. Thus, the attribute “Name” and the attribute “Access” must be recorded when a new face is recognized. Here we use the very simple Python solution of input as string. Please open the “doorcam.py” file e.g. in Visual Studio Code and search for the function “def register_new_face(face_encoding, face_image):”. Right at the beginning the “input” function of Python is called. This function allows you to enter the last name and the value Yes/No for access.
lastname = input("Lastname: ")access = input("Access (yes/no): ")Furthermore, an array is built up with different attributes such as how often the face has already been seen in front of the camera “seen_count”. At the end of this array we now append the two additional attributes “lastname” and “access”.
"lastname": lastname,"access": access,The finished function “register_new_face” looks like this and the adjustments are shown in bold in the source code.
def register_new_face(face_encoding, face_image):"""Add a new person to our list of known faces"""# Add the face encoding to the list of known facesknown_face_encodings.append(face_encoding)print("new face")lastname = input("Lastname: ")access = input("Access (yes/no): ")# Add a matching dictionary entry to our metadata list.# We can use this to keep track of how many times a person has visited, when we last saw them, etc.known_face_metadata.append({"first_seen": datetime.now(),"first_seen_this_interaction": datetime.now(),"last_seen": datetime.now(),"seen_count": 1,"seen_frames": 1,"face_image": face_image,"lastname": lastname,"access": access,})To display the name and access status below the image, this information must be displayed additionally. For this purpose, the following section in the program code must be extended. In bold are the additional lines that have to be inserted or the small change of the position of the label visit_label_v under the image of the visitor.
for metadata in known_face_metadata: # If we have seen this person in the last minute, draw their image if datetime.now() - metadata["last_seen"] < timedelta(seconds=1) and metadata["seen_frames"] > 5: # Draw the known face image x_position = number_of_recent_visitors * 150 frame[30:180, x_position:x_position + 150] = metadata["face_image"] number_of_recent_visitors += 1 # Label the image with how many times they have visited visits = metadata['seen_count'] visit_label_v = f"{visits} visits" visit_label_n = "Lastname: " +metadata['lastname'] visit_label_a = "Access: " +metadata['access'] if visits == 1: visit_label_v = "First visit" + metadata['lastname'] cv2.putText(frame, visit_label_v, (x_position + 10, 160), cv2.FONT_HERSHEY_DUPLEX, 0.6, (255, 255, 255), 1) cv2.putText(frame, visit_label_n, (x_position + 10, 180), cv2.FONT_HERSHEY_DUPLEX, 0.6, (255, 255, 255), 1) cv2.putText(frame, visit_label_a, (x_position + 10, 200), cv2.FONT_HERSHEY_DUPLEX, 0.6, (255, 255, 255), 1) access_actual = metadata['access']Doorcam.py – Servo motor modification
Now that we can assign the attribute access right to each face, the adjustment follows so that the servo motor also opens or closes the barrier. To do this, the Adafruit servo controller library must be integrated and the barrier must be opened or closed depending on the detected face. The finished and so far adapted doorcam.py file is available as doorcam_update.zip. I did not include the source code here because this modification is a bit longer now.
Download: doorcam_update
Summary
This small project is ideal to demonstrate the possibilities that are possible with little effort in programming. The Jetson Nano is ideal for entering the world of artificial intelligence. The great thing about this project is that you get to know the limits of the setup very quickly. This way the software also reacts to images that are shown on a display / smartphone, for example. If the image is tilted or upside down, image recognition no longer works. So everyone can think for themselves how the system can be tricked and also carry out tests to see which images of faces are still recognized as alienated and which are not.


NICE WORK!
HOW COULD I SETUP THE INITIAL FACES AND NAMES?
THANKS
K.