


This post has been replaced by the following contribution:
Autonomously driving Nvidia Jetson Nano AI robot car – preparation
In this article I describe how to build a donkey car based on the NVIDIA Jetson Nano. The difference to a setup with a Raspberry Pi is very small. I want to use a Jetson Nano because I see some advantages. The Jetson Nano is much faster than a Raspberry Pi 3 Model B+ and with the GPU the neural network can not only be executed but also calculated directly in the donkey car. This means that no additional computer with a GPU is required for training the neural network. Since the price difference of about 65,-€ is rather small, the purchase of a Jetson Nano is worthwhile if you can do without an extra computer with GPU support for training the neural network.
For those who prefer an easier introduction to the world of the Jetson Nano, I would like to recommend the JetBot. This small robot would be developed by Nvidiakomplett and offers a one-stop solution from hardware to software. If you don’t want to print the case yourself using the 3D files published by Nvidia, you can also purchase a complete kit from Waveshare. The Waveshare NVIDIA JetBot AI Kit Smart Robot Based offers everything you need. I became aware of this robot kit because NVIDIA recommended it in their blog. I myself have built the Jetson Nano, an autonomous AI robot car, and I am convinced that this kit can be a great source of joy for anyone wishing to gain initial experience in AI based on the NVIDIA JetBot.
If you would like to build your own donkey car based on an RC model and use the computing power of the Jetson Nano instead of the Raspberry Pi, follow the installation instructions below.
Note: Currently there is a new installation guide on the official Donkey Car site that directly supports the Jetson Nano. I haven’t tried the latest version myself and still use the installation instructions as described below.
Preparation of the installation – Donkey Car:
The first step is to write the official NVIDIA image for the Jetson Nano Board to an SD card. For this manual I used the image with the name and version “jetson-nano-sd-r32.1-2019-03-18.img”.
The image file can be found on the NVIDA website at the following URL: https://developer.nvidia.com/embedded/learn/get-started-jetson-nano-devkit#write
You should write the image file to a fast Mirco-SD card, which is at least 32GB in size. Then plug it into the nano board, connect the board to a monitor, mouse, keyboard and switch it on (establish power supply via micro-USB connector).
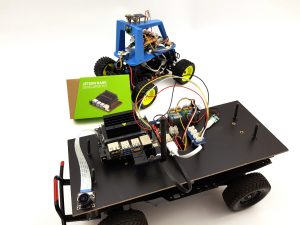
NVIDIA Jetson Nano Donkey Car
The first steps are quite simple. Once the language and the keyboard layout must be defined. Then a connection is established to the own network via WIFI USB adapter. An alternative is of course the LAN cable. But this doesn’t really make sense on a donkey car.
The following USB WIFI adapter worked perfectly on my Jetson Nano.
Note – Start network automatically:
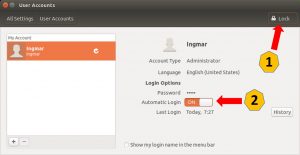
To ensure that a network connection via the WIFI USB adapter always connects automatically, even if you do not enter user/password via a monitor/keyboard, you must set up your profile in the user settings so that your user automatically logs in under Ubuntu.
To customize the user account please click on the search icon in the upper left corner and search for “user” (1). Now click on the symbol for user accounts (2). The window with the existing user accounts opens.

Jetson Nano User Account
Now select the appropriate user who should log in automatically. To do this, use the admin password to unlock the profile (lock) in the top right corner (1). Then switch the “Automatic Login” switch to ON (2).
Jetson Nano User Account Settings
After everything has been configured, switch to the terminal window to continue with the software installation.
Note – Network connection:
For the complete installation I recommend to connect the Donkey Car via network cable to your LAN. The WIFI connection has proven to be very unstable on my Jetson Nano and USB WIFI adapter.
Helpful tools:
To make the configuration a bit easier I always use the text editor Nano and the Midnight Commander. Both tools are installed on the Jetson Nano using the following commands.
The first thing you do is update the repository information. To do this, execute the following command.
Command: sudo apt-get update
Nano is the simple text editor I personally prefer. Therefore I recommend the installation at this point.
Command: sudo apt-get install nano
With the Midnight Commander you can easily edit or copy files in the Linux terminal without the need to know the necessary Linux commands.
Command: sudo apt-get install mc
Since nmap is not installed on the Jetson Nano, it must be installed with the following command.
Command: sudo apt-get install nmap
After the update is done, the two tools “Nano” and “MC” are installed, the actual software installation for the Donkey Car Framework on the Jetson Nano begins.
Remote Desktop Control
I have repeatedly failed to activate the remote desktop control. So I searched the internet for a solution and came across the
following page “Getting Started with the NVIDIA Jetson Nano Developer Kit“. The solution described here works without problems and allows me to control the Jetson Nano remotely via a graphical interface. I need this graphical view, because I can change / dial the WIFI connection for example.
Since there is probably an incompatibility with the Gnome desktop and the graphical configuration of the desktop sharing properties crashes loudly, some small adjustments have to be made to make the setting work. After these adjustments it is possible to connect to the Jetson Nano computer with the RealVNC client from e.g. a Windows computer.
First, open the Terminal window with the following command in the file “org.gnome.Vino.gschema.xml”:
Command: sudo nano /usr/share/glib-2.0/schemas/org.gnome.Vino.gschema.xml
Then add the following lines to the “org.gnome.Vino.gschema.xml” file I have inserted these lines right at the beginning.
<key name='enabled' type='b'>
   <summary>Enable remote access to the desktop</summary>
   <description>
   If true, allows remote access to the desktop via the RFB
   protocol. Users on remote machines may then connect to the
   desktop using a VNC viewer.
   </description>
   <default>false</default>
</key>
The following picture shows where I have inserted the lines in the XML file.
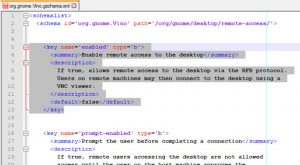
org.gnome.Vino.gschema
Then save the changes. Now the gnome schemas “glib-compile-schemas” must be recompiled with the following command.
Please execute the following command in the terminal window:
Command: sudo glib-compile-schemas /usr/share/glib-2.0/schemas
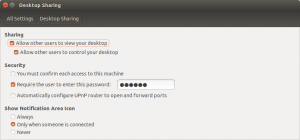
From now on it is possible to start the Desktop Sharing features via the graphical user interface and configure the Desktop Sharing. To do so, please click on the “Settings” icon in the lower left corner and then click on the “Desktop Sharing” entry. The Desktop Sharing configuration starts now. In the Desktop Sharing interface make the changes as shown in the following picture.
Jetson Nano – Desktop Sharing
In order for the VNC server on the Jetson Nano to start automatically, a further setting must be made. Please click on the “A” symbol for the search in the upper left corner. Search for “startup applications” to start the VNC server after each restart of the Jetson Nano. Click on the “startup applications” entry and make the following settings in the “Startup Applications Preferences” view.
1. click on “add” to make a new entry for the VNC server and name it Vino
2. add the following line “/usr/lib/vino/vino-server” in the “Command” field
3. in the field “Comment” you can enter for example “VNC Server”.
4. save the settings with the “Save” button.
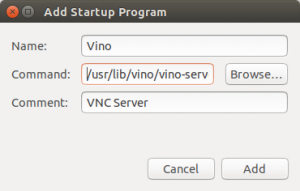
Jetson Nano VNC Server Auto Start
Vino uses TLS security type (18) encryption which is not supported by many programs like the TightVNC client or RealVNC client. Therefore the following commands must be executed in the terminal window to deactivate the encryption. Therefore, after deactivation, communication with the Jetson Nano should only take place within a secure network.
Command: gsettings set org.gnome.Vino require-encryption false
Command: gsettings set org.gnome.Vino prompt-enabled false
Now please restart the Jetson Nano. The VNC server should now start automatically and you can check this with the small program nmap. You can check if the VNC server is running actively with the following command in the terminal window.
Command: nmap <Name des Computer z. B. nano>
Since my Jetson Nano has been given the name “nano”, I run “nmap nano”.
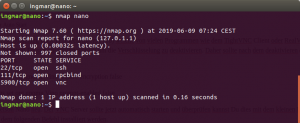
Jetson Nano nmap VNS server
Software installation:
I would like to thank all users of the NVIDIA forum for the many hints available there and “Fei Cheung” for this description Getting started with Jetson Nano and Donkey car aka Autonomous Car Portal. First you will install some Python libraries and libraries for using TensorFlow.
Command: sudo apt-get install python3-pip libhdf5-serial-dev hdf5-tools
After installation, it is essential to reboot the system. Because the following step always threw a long list of mistakes and after many repetitions it must have been the missing restart. Restart the NANO with the following command:
Command: sudo reboot
With me the installation of TensorFlow with the following command worked without errors at some point. For all those who want to understand the following command better in its structure I recommend the following explanation from NVIDIA (Installing TensorFlow)
Command: pip3 install --no-cache-dir --extra-index-url https://developer.download.nvidia.com/compute/redist/jp/v42 tensorflow-gpu==1.13.1+nv19.3 --user
Hint: I had several problems installing the software in the last days. With the addition –no-cache-you got it working now. So if there is an error during the installation, this post may help. Unable to install TensorFlow on Jetson Nano because of “404” on NVidia server!
The installation takes quite long and it is not worth watching the screen. After the installation of TensorFlow you can check if it was successful as follows Start python3 in the console with the following command:
Command: python3
Then import TensorFlow in this Python3 environment with the following command.
Command: import tensorflow as tf
No message should appear in the terminal window. If an error occurs then TensorFlow is not installed correctly. With the action combination “CTRL + D” you leave or exit the Python3 environment.
Command: CTRL + D
Next you can install the Pytorch Framework. To do this, first download it from the NVIDIA site using the following command in the terminal window:
Command: wget https://nvidia.box.com/shared/static/veo87trfaawj5pfwuqvhl6mzc5b55fbj.whl -O torch-1.1.0a0+b457266-cp36-cp36m-linux_aarch64.whl
Then start the installation with this command:
Command: pip3 install numpy torch-1.1.0a0+b457266-cp36-cp36m-linux_aarch64.whl
After the successful installation, test again if Pytorch was installed successfully. To do this, you must again
Command: python3
Now import Pytorch with:
Command: import torch
The version number e.g. “1.1.0a0+b457266” should be displayed. However, I did not receive any more reports. Next, we are interested in whether CUDA driver support is available. To do this, execute the following print command.
Command: print('CUDA available: ' + str(torch.cuda.is_available()))
The message “CUDA available: True” should now appear in the terminal window. With the key combination “CTRL + D” you leave the Python3 environment again.
Command: CTRL + D
Finally, the packages SCIPY and KERAS are installed. Both are required to run the Donkey Car Framework on the Jetson Nano. To do this, execute the following two commands one after the other.
Command: sudo apt-get install python3-scipy
Command: sudo apt-get install python3-keras
Here we test after the installation if KERAS was successfully installed. To do so, switch back to the PAthon3 environment.
Command: python3
Then you import KERAS in this environment.
Command: import keras
Now the part of the software installation that lays the foundation for the Donkey Car Framework is complete. Now follow special packages that are needed like the library from Adafruit for the PCA9685 servo controller. You install this with the following command:
Command: pip3 install Adafruit_PCA9685
The pins are arranged identically to the Raspberry Pi. That means 3.3V, SCL, SDA and GND are the same pins and therefore there is no change to the Raspberry Pi.
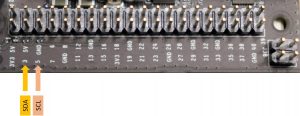
Jetson Nano I2C busAfter you have connected the PCA9685 servo controller, execute the following command to see if the servo controller is found.
Command: sudo i2cdetect -y -r 1
You should see the servo controller with the two I²C addresses 40 and 70 in the terminal window.
In order for the user you are working with on the JEtson Nano, i.e. the user you created at the beginning of the installation, to be able to access the I²C bus without sudo, this user must be added to the i2c group. To do this, execute the following command.
Command: sudo usermod -a -G i2c <hier den usernamen eingeben>
Please restart the nano now with the following command:
Command: sudo reboot
After the NANO has rebooted, check if your user has been added to the i2c group. To do this, execute the following command in the Terminal window.
Command: groups
A message similar to the following should appear.
i2c adm cdrom sudo audio dip video plugdev lpadmin gdm sambashare gpio
Now everything is installed and ready to work.
Die Kameraunterstützung am Jetson Nano
Als nächstes schließen Sie die Kamera an. Welche Kamera am Jetson Nano funktioniert fahren Sie im Beitrag Jetson Nano – Raspberry Pi CSI Weitwinkelkamera von mir.
Donkey Car Framework installieren:
Wie zu Beginn des Artikel erwähnt folge ich mit Dieser Anleitung in weiten Teilen der Beschreibung von Fei Cheung. Er hat eine Version des Donkey Car Frameworks auf GitHub online gestellt die mit kleinen Modifikationen auf dem Jetson Nano läuft. Daher wird im weiteren Verlauf der Beschreibung genau diese Version installiert. Zu nächst klonen Sie das Donkey Framework von GitHub auf den Jetson Nano mit dem folgenden Befehl.
Befehl: git clone https://github.com/custom-build-robots/donkeycar.git
Dann wechseln Si emit dem Befehl “cd donkeycar“ in das Verzeichnis.
Befehl: cd donkeycar
Mit dem folgenden Befehl installieren Sie dann das Donkey Car Framework auf dem Jetson Nano. Das kann eine lange Zeit in Anspruch nehmen da noch weitere Abhängigkeiten installiert werden.
Befehl: pip3 install -e .
Nach einem Neustart ist das Donkey Car Framework installiert und kann genutzt werden sprich die nachfolgenden Schritte ausgeführt werden. Fei Cheung schreibt in seinem Post auch etwas zu den Anpassungen die er vorgenommen hat. Diese Anpassungen sind schon soweit in dem von mir bereit gestellten GitHub Repository integriert. For those who are interested. I edit the following things.
- Add a new camera class
- Add a default bus to Actuator parts
- Add Int typecasting in Keras.py for a variable to make training works
Bevor Sie jetzt die eigentliche Instanz des Donkey Car Frameworks auf Ihrem Jetson Nano initialisieren ist e seine kurze Überlegung wert dieses in einer virtuellen Umgebung vorzunehmen. Diese installieren Sie wie folgt.
Befehl: sudo apt-get install virtualenv
Das Kürzel „env“ steht hier für den Namen der virtuellen Umgebung die Sie anlegen.
Befehl: virtualenv env -p python3
Anschließend müssen Sie die virtuelle Umgebung „env“ aktivieren damit Sie in dieser die Instanz des Donkey Cars anlegen können.
Befehl: source env/bin/activate
Mit dem folgenden Befehl legen Sie die Donkey Car Instanz „mycar“ in der zuvor gestarteten virtuellen Umgebung mit dem Namen “env” an. Sie befinden sich im Pfad /home/<user name>/donkeycar.
Befehl: donkey createcar mycar
Ab jetzt können Sie über den Ordner mycar das Donkey Car Framework konfigurieren und starten. Wie das genau geht und was Sie hier machen können entnehmen Sie bitte meinen Beiträgen rund um das Donkey Car.
Hinweis – virtuelle Umgebung automatisch starten:
Damit die virtuelle Umgebung mit dem Namen “env” immer gestartet wird wenn Du Dich mit Deinem User am Nano anmeldest musst Du in der “/home/<user name>/.bashrc” Datei ganz am Ende den Aufruf “source env/bin/activate” einfügen um die virtuelle Umgebung automatisch bei jedem Login zu starten.

Terminal auto load virtual env
manage.py und config.py
In dem Repository stehen die von mir angepassten manage.py und config.py Dateien zur Verfügung. Bitte die im Repository vorhandene “config_and_manage.zip” Datei in den zuvor erstellten “mycar” Ordner entpacken und die beiden vorhandenen manage.py und config.py Dateien überschreiben. Danach sollte es möglich sein mit dem Donkey Car und einem Sony PS4 Controller fahren zu können.
Hinweis – Anpassungen config.py:
In der config.py Dateien müssen Sie noch die für Ihr Donkey Car gültigen Konfigurationen vornehmen.
Mit dem folgenden Befehl wird auf dem Jetson Nano das Donkey Car Framework gestartet um die Trainingsdaten aufzuzeichnen. Bitte in den Ordner mycar wechseln.
Befehl: cd ~/donkeycar/mycar
Trainingsdaten aufzeichnen
Anschließend den folgenden Befehl ausführen. Hier muss eventuell wie gezeigt ein sudo vorgestellt werden. Wenn ein Fehler kommen sollte dann einmal ohne sudo probieren.
Befehl: sudo python3 manage.py drive
Sie dazu auch den folgenden Bericht der an dieser Stelle unabhängig vom Raspberry Pi oder Jetson Nano Gültigkeit hat.
Autonom fahrendes Raspberry Pi KI Roboter-Auto – Trainingsdaten aufzeichnen
Neuronales Netz trainieren
Nach dem die Trainingsdaten aufgezeichnet sind kann das Neuronale Netz mit dem folgenden Befehl trainiert werden. Wichtig dabei ist, dass die für das Training zu verwendenden Daten im Ordner “/home/<user>/donkey/mycar/data” liegen. Das tranierte Neuronale Netz mit dem Namen mypilot liegt im order “/home/<user>/donkey/mycar/models”.
Befehl: sudo python3 ~/donkeycar/mycar/manage.py train --model ~/donkeycar/mycar/models/mypilot
Speicherbelegung
Beim Training des Neuronalen Netzes habe ich Fehlermeldungen erhalten, dass zu wenig speicher verfügbar ist und es so zu Performance Problemen kommen kann. Das nachfolgende Bild zeigt die Meldung beim Training des Piloten auf dem Jetson Nano.
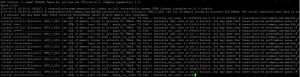
Jetson Nano Donkey Car – training memory problem
Eine Abhilfe schafft das Anlegen einer Swap Datei in die bei zu wenig freien Arbeitsspeicher entsprechende Daten ausgelagert werden können. Dazu wird diese Swap Datei auf der micro SD-Karte angelegt. Das Anlegen der Swap Datei geht mit den nachfolgenden Befehlen.
Befehl: sudo fallocate -l 6G /var/swapfile
Befehl: sudo chmod 600 /var/swapfile
Befehl: sudo mkswap /var/swapfile
Befehl: sudo swapon /var/swapfile
Befehl: sudo bash -c 'echo "/var/swapfile swap swap defaults 0 0" >> /etc/fstab'
Nach dem Einrichten der Swap Datei kam es bei mir zu keinen Meldungen mehr während dem Training des Neuronalen Netzes das zu wenig Speicher verfügbar wäre. Viele weitere gute Tips und Anleitungen finden sich unter der folgenden URL: Jetbot WIKI
Autopiloten starten
Nach dem das Neuronale Netz mypilot erfolgreich trainiert wurde kann es mit dem folgenden Befehl gestartet werden.
Befehl: sudo python3 ~/donkeycar/mycar/manage.py drive --model ~/donkeycar/mycar/models/mypilot
Video – Jetson Nano self-driving Donkey Car:
Das Video zeigt die ersten autonom gefahrerenen Runden mit dem Jetson Nano und die kleinen Fehler die noch passiert sind.

Zusammenfassung:
Mir gefällt das Jetson Nano sehr gut. Es ist ein kompaktes Board mit richtig viel Power. Auch die softwareinstallation klappte recht gut und fast ohne Probleme. Hier geht ein großer Dank an für seinen tollen Beitrag und für das überarbeitete Donkey Car Framework. Wie es mit der Stromversorgung weiter geht muss ich noch prüfen.
Artikel Übersicht Donkeycar Roboter Auto:
Autonom fahrendes Raspberry Pi KI Roboter-Auto – EinleitungAutonom fahrendes Raspberry Pi KI Roboter-Auto – Chassis
Autonom fahrendes Raspberry Pi KI Roboter-Auto – Elektronik
Autonom fahrendes Raspberry Pi KI Roboter-Auto – Software Installation
Autonom fahrendes Raspberry Pi KI Roboter-Auto – Kalibrierung
Autonom fahrendes Raspberry Pi KI Roboter-Auto – Trainings Vorbereitungen
Autonom fahrendes Raspberry Pi KI Roboter-Auto – Trainingsdaten aufzeichnen
Autonom fahrendes Raspberry Pi KI Roboter-Auto – das Neuronale Netz trainieren
Autonom fahrendes Raspberry Pi KI Roboter-Auto – Donkeycar training in einem Docker Container (optional)
Autonom fahrendes Raspberry Pi KI Roboter-Auto – Donkey Car UNIMOG Upgrade
Autonom fahrendes Raspberry Pi KI Roboter-Auto – Manuelle Short Keys
Autonom fahrendes Raspberry Pi KI Roboter-Auto – IMU Sensor 9-DOF absolute Orientation
Autonom fahrendes Nvidia Jetson Nano AI Roboter-Auto – Vorbereitung
Autonom fahrendes Nvidia Jetson Nano AI Roboter-Auto – Software Installation
Autonom fahrendes Nvidia Jetson Nano AI Roboter-Auto – Konfiguration des Donkey Car Frameworks


Recent Comments