


The SainSmart robot arm is originally designed for the Arduino and for this tiny board all the holes are drilled into the base to screw it on the robotic arm. But it is also possible to control the six servo motors of the robotic arm with a Raspberry Pi SBC. I used a sheet of coardboard on top of the base to mount the Raspberry Pi 3 Model B and the PCA9685 servo controller on the base of the arm. Below I will explain which software you need to install on the Raspberry Pi. The PCA9685 servo controller is used to control the six servo motors with a Python program running on the Raspberry Pi. The program has a web interface to control the robotic arm. The robotic arm is very flexible and you could use a micro controller like the Arduino or a Single Board Computer like the Raspberry Pi to control and program the robotic arm.
The picture below shows the robotic arm and the cardboard I used to mount the servo controller and Rapsberry Pi on it.
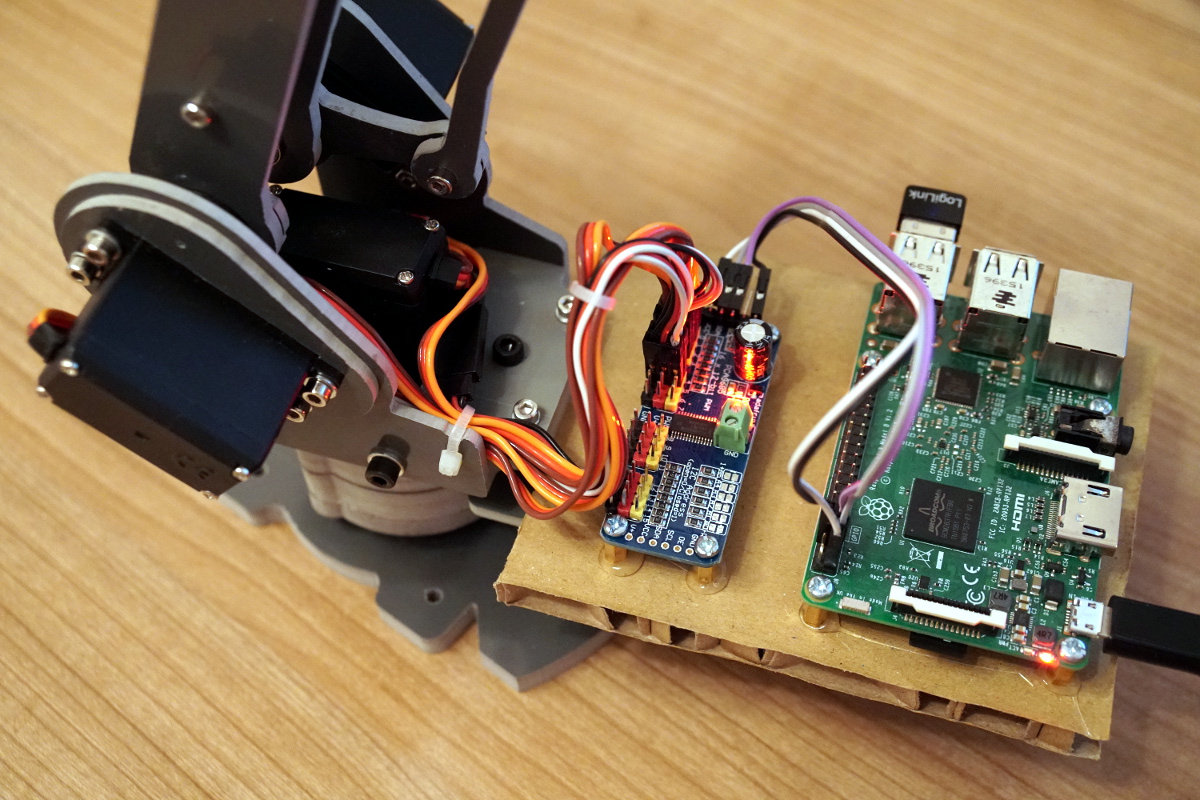
SainSmart 6 Achsen Desktop Roboter Arm – Raspberry Pi
The next chapter describes the software installation steps.
Software installation robotic arm kit
The idea is to control the robotic arm with a python program. The Python program talks to the PCA9685 servo controller which generates a PWM signal to control the servo motors. With the PWM signal the servo motors know the position they have to move to. The Raspberry Pi itself is able to generate via software a PWM signal but it is not clear enough to control a robotic arm like this model with six servo motors.
The next step is to install the following software packges on your Raspberry Pi with the commands listed below.
- sudo apt-get update
- sudo apt-get upgrade -y
- sudo apt-get install mc -y
- sudo apt-get install python-smbus -y
- sudo apt-get install i2c-tools -y
- sudo apt-get install git build-essential python-dev -y
- sudo git clone https://github.com/adafruit/Adafruit_Python_PCA9685.git
- sudo apt-get install flask
Yep, know the software is installed you need to start the python program I have written for the robotic arm.
Hint: If you need more details and how to use the PCA9685 servo controller I wrote a step by step guide on my blog as well. Just follow the link: 16-Kanal PCA9685 Servo Kontroller – Teil 1 Einführung und Aufbau
Python Programm – web-interface
The python program used to control the servo motors with the PCA9685 servo controller uses a web interface as user interface. This enables you to control the robotic arm from your desktop pc or smartphone without using a terminal window. This is the reason why you installed the flask web server in the previous chapter.
Hint: A very good how to guide with many examples is avaialbe online here: Build a Python Web Server with Flask
I published the program to control the robotic arm with the web interface on my github account: 6-Axis-Desktop-Robotic-Arm-Raspberry-Pi
The nex command clones the repository on your Raspberry Pi. The repo includs all the programs you need to control your robot arm
- sudo git clone https://github.com/custom-build-robots/6-Axis-Desktop-Robotic-Arm-Raspberry-Pi
After cloning the respository the software is installed on your Raspberry Pi to control the robotic arm. Important is to check the wiring if the six servo motors are connected to the channels 1 – 5 on your PCA9685 servo controller. This step is important because you set the order or channel id for each servo motor now. I used the following channels in the python program as listed below. The first channel ID starts with zero that the reason why we need the channels 0 – 5.
- Servo 0 – turn the robotic arm from left to right.
- Servo 1 – tilts the first part form the robotic arm up and down.
- Servo 2 – tiltst the second part of the robotic arm up and down.
- Servo 3 – turns the front outrigger left and right.
- Servo 4 – turns the head of the robotic arm left and right.
- Servo 5 – tilts the head of the robotic arm up and down.
Now you are able to control the servo motors with the python program but please read the next chapter very carefully.
Hint: The robotic arm is not calibrated now. If you power up the robotic arm the first time the servo motors will move in a default position defined inside the python program. Be careful not to damage the servo motors because they are moving to far and getting hot. If you have this case then remove the servo motor wire from the servo contoller to disconnect the servo motor and calibrate the default position of this servo motor.
How to calibrate the robotic arm and the six servo motors is explained in the next post.
Robot arm Summary
With the Raspberry Pi 3 Model B and the PCA9685 servo controller you have all you need to control the robotic arm. You installed all the software you need and cloned the python program from git hub. I published a first version of the Pyhton program but is works and I will improve it in the future. The next step is to calibrate the servo motors to prevent them from getting hot.
Article list - SainSmart 6-Axis Desktop Robotic Arm:
SainSmart 6-Axis Desktop Robotic Arm – Raspberry PiSainSmart 6-Axis Desktop Robotic Arm – Raspberry Pi wiring
SainSmart 6-Axis Desktop Robotic Arm - Raspberry Pi software installation
SainSmart 6-Axis Desktop Robotic Arm – Raspberry Pi web interface test


“sudo apt-get install flask” no longer installs flask on the pi
Any suggestions or ideas are welcome Frank how to install flask now.
Can you give me some more detailed instructions on how to install the software. My students are having trouble getting it to install. Thank you very much
Hi I need some more details to help you where your problem is.
thank you in advance, everything goes smoothly, again thank you very much, and i want to ask, when i use putty why not run using browser in my laptop, whereas for at localhost / browser raspberry just walk?
Robot-control.py file seems to have an error. The following line is missing a parentheses: print “Received ” + str(speed). When I edit to fix I do not have permissions to save the changed file. I tried saving a new file in same location but did not have permissions. When I save in other folders, I have current directory issues. Please help. Thank you.
Robot-control.py file seems to have an error. The following line is missing a parentheses: print “Received ” + str(speed). When I edit to fix I do not have permissions to save the changed file. I tried saving a new file in same location but did not have permissions. When I save in other folders, I have current directory issues. Please help. Thank you.