


I had the idea to build a face with two eyes for one of my Raspberry Pi robots. The best and easiest way would be a LED matrix for each eye. I searched for a LED matrix which offers an I2C connector. The I2C bus only needs two wires for SDA and SCL. The I2C bus makes it very easy to hook up the Raspberry Pi and the LED matrix. I bought two HT16K33 8×8 LED matrix’s with red LEDs.
The picture below shows my setup with a Raspberry Pi 3 Model B and the HT16K33 8×8 LED matrix.
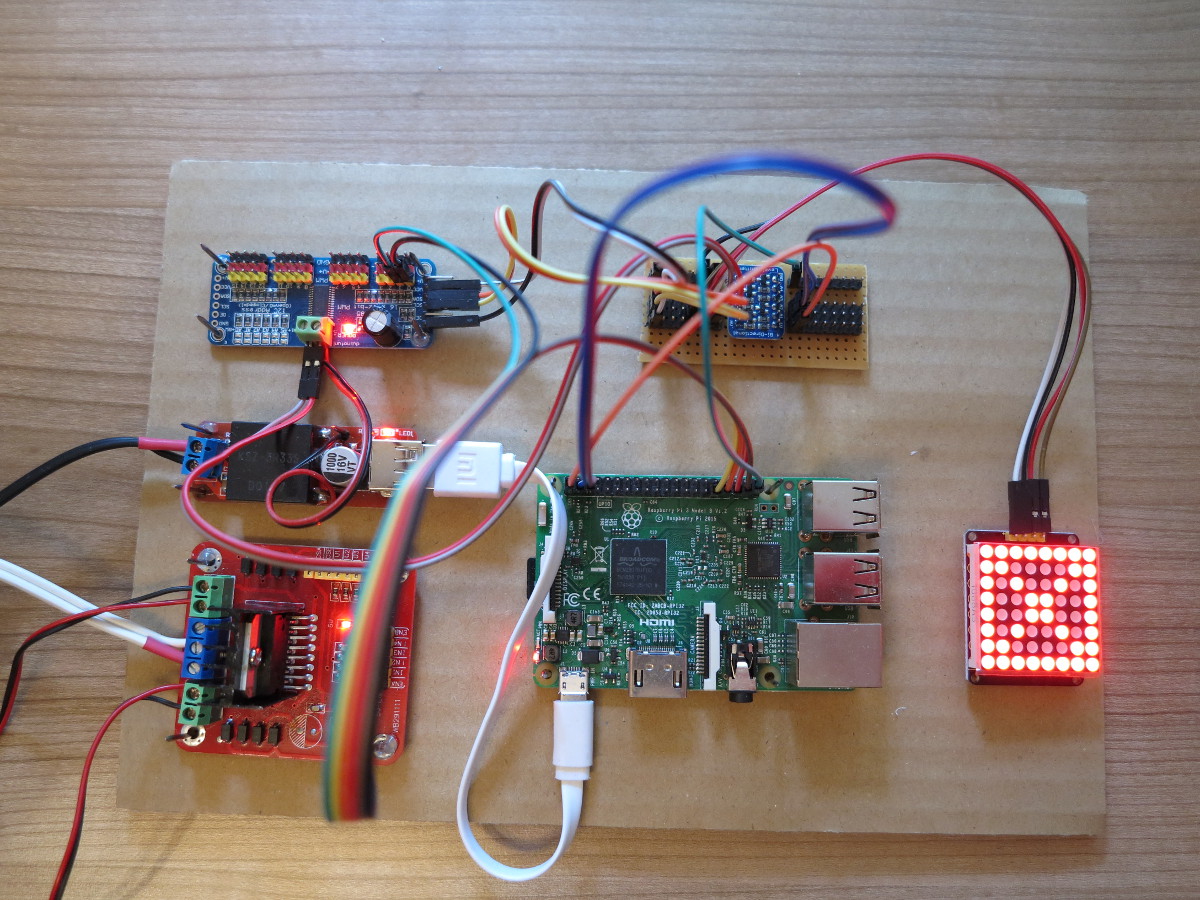
Raspberry Pi – I2C LED matrix HT16K33
The next chapter describes which programs you need to control the LED matrix. I used the Python library from Adafruit.
Software LED matrix
First you have to install some software packages to enable the I2C bus and an Adafruit Python library to speak with the LED matrix. Please execute the following commands one after the other.
Command: sudo apt-get update
Command: sudo apt-get install build-essential python-dev
Command: sudo apt-get install python-smbus
You need the Python Imaging Library (PIL) which adds image processing capabilities to your Python interpreter.
Command: sudo apt-get python-imaging
After executing the four commands above now you have to install the Adafruit Python LED Backpack.
Step 1: Create a folder in your home directory (/pi/home/) with the name “led”.
Step 2: Download the Adafruit Python LED Backpack with the following command.
Command: sudo git clone https://github.com/adafruit/Adafruit_Python_LED_Backpack.git
After successfully downloading the library go into the led folder “/home/pi/led/Adafruit_Python_LED_Backpack” and execute the following command to install the library on your Raspberry Pi
Command: sudo python setup.py install
The next step is to check if the LED matrix is available on your I2C SMB bus. To search for the LED matrix execute the following command:
Command: sudo i2cdetect -y 1
You should see your LED matrix for example on the address 40 like in my case.

I2C LED matrix HT16K33 Raspberry Pi
Now your setup should be ready for the Python test program from Adafruit.
Adafruit 8×8 LED test program
To execute the Adafruit LED test example go into the folder “/home/pi/led/Adafruit_Python_LED_Backpack/example” and execute the “matrix8x8_test.py” program if the I2C address is correct for your LED matrix.
Command: python matrix8x8_test.py
The program should activate the LED’s and show a X with a frame on the LED matrix at the end.
Summary
With the Adafruit library it is very easy to control an 8×8 LED matrix. The example programs explains how to light up a special LED in the matrix. With some practice it possible to show your own symbols or signs on the LED matrix. With two LED matrixes and a unique I2C address for each matrix I am now able to build my own face for my robot.


Recent Comments